
Treating Google Drive as a backup isn’t always the best practice when you want to keep your data safe. A good backup needs to be resilient to unintended changes, but since Google Drive syncs changes and doesn’t keep iterative backups, it violates the data backup best practices everyone should be following. It’s really more of a sharing, collaboration, and redundancy solution.
What if you want to actually back up your content on Google Google Drive, though? Mainly, you want to back up Google Drive to an external device that you can then unplug, archive, or otherwise protect in other ways. Well, there are a few different ways you can do it, so let’s go through them.
Option 1: Manually Download Files
The first option is fairly simple. As long as the external hard drive you want to download your data to is connected to your computer, follow these steps.
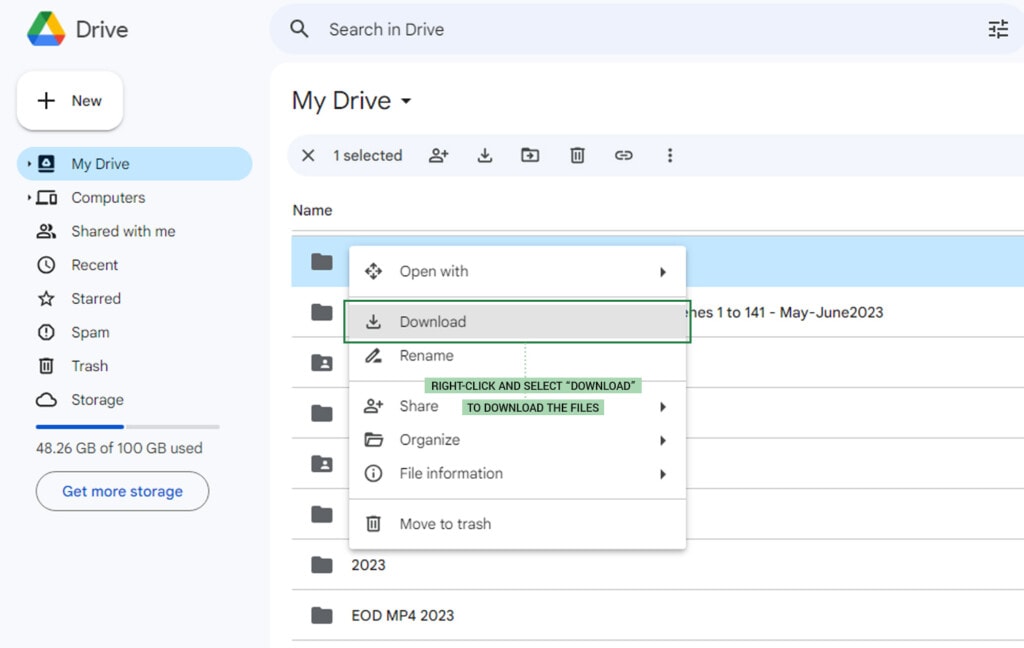
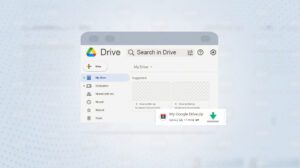
- Log into your Google Drive account on drive.google.com.
- Select any files you want to download to your external hard drive.
- Right-click and select “Download” to download the files.
This will download the files to your computer, but there’s no option to choose where to put them. They’ll simply be put wherever your web browser has set as the default download location. So, navigate to that location and drag the files from there to your external hard drive.
Obviously, this has issues. For one thing, it takes up space on your local hard drive and uses it as an intermediary, which is inefficient. Requiring two copy actions also adds wear and tear to your drive.
You can get around this by changing the default download location of your web browser to the location on the external hard drive you want your files to reside.
Alternatively, if you use Google Drive for Desktop on your computer already, you have access to your files from the usual File Explorer. This gives you an alternative option for downloading your data to your external hard drive.
- Find the Google Drive folder on your computer.
- Select all the files and folders you want to copy to your external hard drive.
- Right-click and choose “copy” or click and drag them to the external drive.
- Paste the files in the external drive.
This also works, though the larger the operation, the longer it will take and the more chance you have of failure; it’s usually recommended that you copy files in batches to avoid larger operations failing.
And, of course, the larger your Google Drive, the less feasible this operation will be. A few gigabytes of data will be slow but will transfer fine, but if your Drive has hundreds of gigabytes of data you want to back up (or more), then you’re going to be at it for a long, long time. There has to be a better way, right? Possibly, yes.
Option 2: Limited Exports with Google Vault
A second possibility is to use Google Vault, one of the many services Google offers for managing large amounts of data. Google Vault is, despite the name, not a backup utility in the classical sense. It’s used for data retention and compliance more than anything else.
Essentially, Google Vault is a service that comes with certain Google Workspace accounts but isn’t available for users of the standard free Google Drive. It archives and stores data you choose from Gmail, Drive, Chat, Meet, Groups, Voice, Sites, and Hangouts when the right options are turned on and configured.
The Vault stores this information in a kind of “cold storage” that preserves the data as-is, frozen in time, with iterative archives. That is, if the data changes over time, new snapshots are taken and added to the Vault.
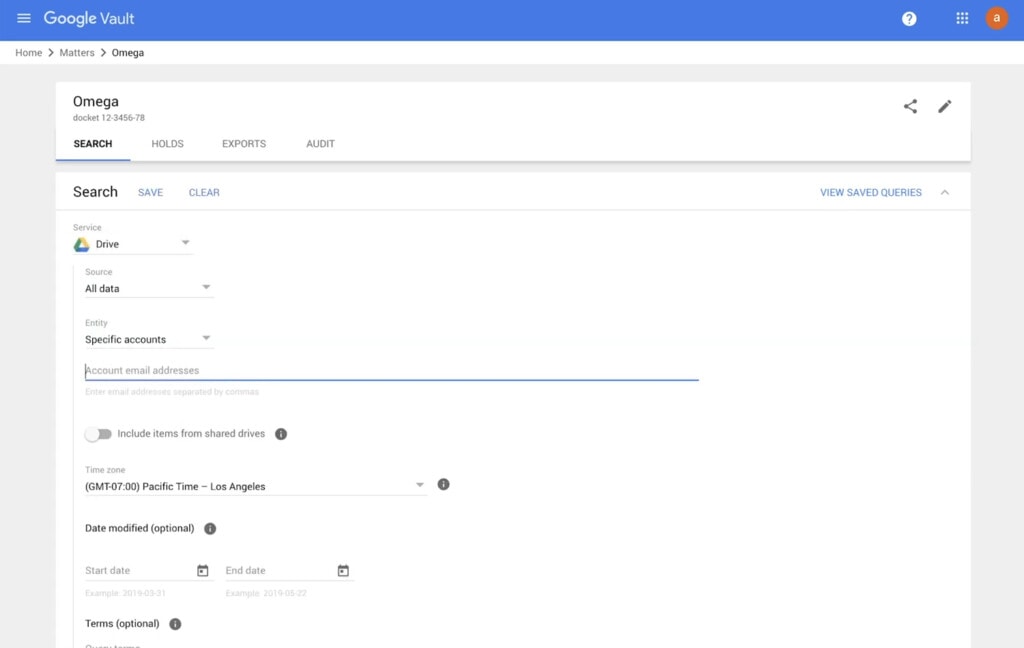
All of this is in line with the purpose of Vault: compliance. If a lawsuit occurs and legal discovery needs specific copies of data from a specific point in time – even if that data has changed since – Vault will be able to recover those snapshots and provide them for legal.
When data is uploaded to Google Vault, it is indexed and categorized for later search and eDiscovery. It is also subject to retention rules. For example, if your company operates in an industry where you need to hold data for seven years, you can set the option that deletes anything older than seven years. That way, you make sure you hold data as long as you need to and no longer.
During the time that the data is available in Vault, it can be searched, and specific data can be exported and downloaded. Technically, you can use this to download the data to an external hard drive.
![]()
![]() Note: All this said, this is absolutely not a backup solution, and using it as such can cause problems down the line, particularly if auditing or anything of that nature needs to happen. Many people think of Google Vault as a way to archive data, but that’s only part of the story. Unfortunately, this option really isn’t one you’re going to want to use in most cases.
Note: All this said, this is absolutely not a backup solution, and using it as such can cause problems down the line, particularly if auditing or anything of that nature needs to happen. Many people think of Google Vault as a way to archive data, but that’s only part of the story. Unfortunately, this option really isn’t one you’re going to want to use in most cases.
Option 3: Downloading Data with Google Takeout
Google Takeout is one of the tools Google offers for downloading and archiving data. It sounds perfect for our needs here, but is it? If you want to try it for yourself, you can find it here.
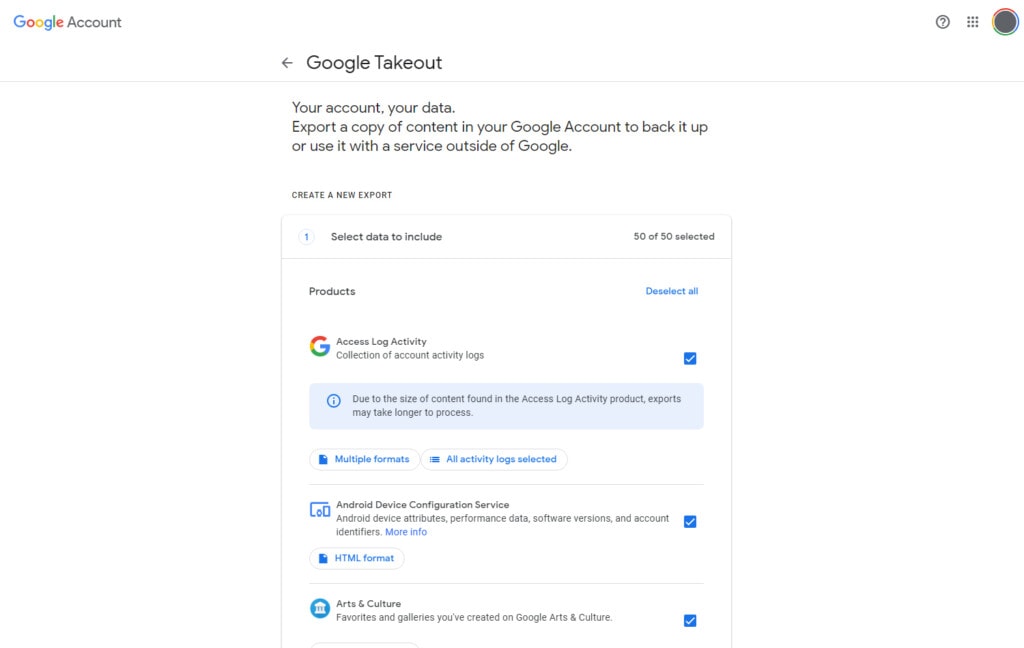
Google Takeout is a free option offered to everyone with a Google account, regardless of whether or not they pay for any of the larger Workspace accounts. It’s also known as “download my data” and is a way to download everything associated with a given Google account across the board. That means everything.
- Access and activity logs.
- Android device configurations.
- Arts & Culture favorites.
- Assignments from Google Classroom.
- Blogger blogs and data.
- Calendar data.
- Chrome data, bookmarks, and history.
- Classic sites.
- Contacts
- Crisis reports.
- Research data you’ve shared.
- Everything in Google Drive
- Google Fit data
- Google account data in general.
- Google business profile data.
- Google Chat logs and history.
- Google Cloud search data.
- Google finance data.
- Google Help contributions.
- Google Pay saved data.
- Google Photos and videos saved.
- Google Play books, games, movies, TV, store data, and apps.
- Google Shopping data.
- Google Store data.
- Google Translator toolkit information.
- Workspace Marketplace data.
- Groups data.
- Hangouts logs and attachments.
- Google Home app data.
- Keep notes and media.
- Location history.
- Gmail messages and attachments.
- Maps data and location saves.
- Activity logs, maps, and news.
- Phone audio and transcriptions.
- Pinpoint data.
- Profile information.
- Purchases and reservations performed through Google services.
- Reminders you’ve created through Google.
- Saved data on search and maps.
- Search contributions, ratings, and reviews.
- Shopping lists from Google Shopping.
- Anything you’ve uploaded to Street View.
- Tasks data.
- YouTube watch history and YouTube Music information.
Now, most of this isn’t relevant to just Google Drive. In fact, almost all of it is irrelevant. Thankfully, you can check and uncheck each different entry on the list, so if all you want to do is back up your Google Drive files, you can unselect everything except Google Drive and proceed.
The nice thing is that Google will package up all of your data and work on downloading it in one recoverable batch so that if you have a flaky internet connection or other issues, it will resume and continue until it is complete. It also works on any account, no matter how large it is. Of course, the larger the account, the longer it will take, especially if you don’t have a fast internet connection.
You can also download this data directly to your external hard drive. You don’t need to put it on a local device before moving it to the hard drive the way you would in other backup systems.
So far, it sounds like Takeout is the most effective way to download your Google Drive data to back it up on an external hard drive. You can get started pretty easily, too.
Option 4: Syncing Data with Google Drive for Desktop
Another option is one you might have thought of but weren’t sure if it would work or not: Google Drive for Desktop.
Formerly known as Backup and Sync, Google Drive for Desktop is the app you install to make managing data in Google Drive a lot more efficient. Rather than requiring you to go through the web interface to manage your data, you can treat it just like anything else on your computer.
The question is, how can you use this to download your Google Drive data to an external hard drive?
First, make sure you have Drive for Desktop installed. If you don’t, you can still set this process up, of course, but you’ll need to install the program for it to work.
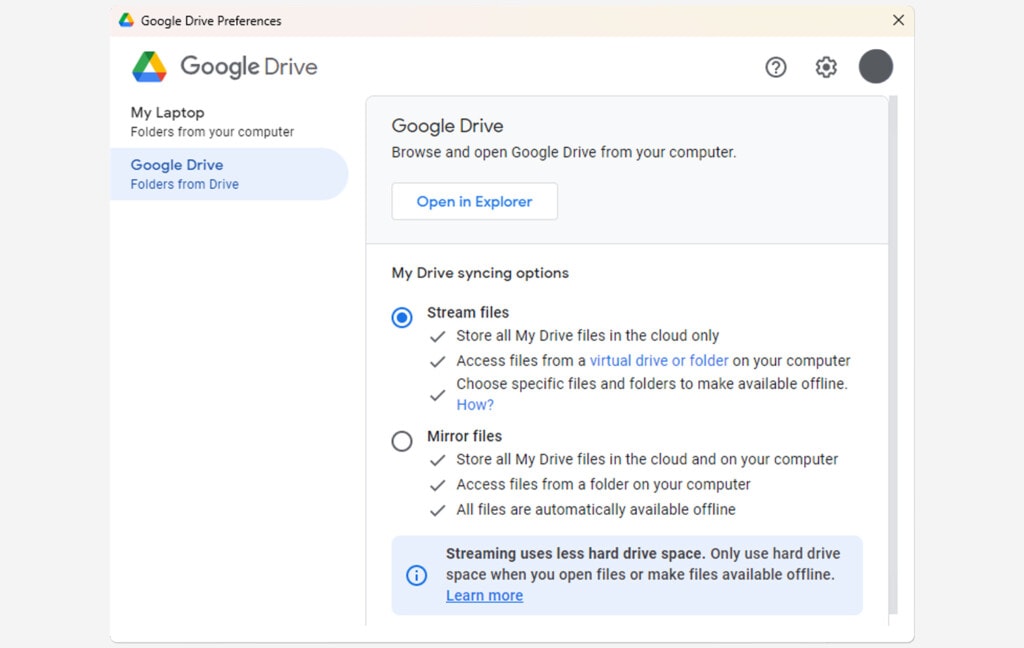
Next, go into your Google Drive for Desktop preferences and settings, and choose a new folder to back up. The folder you should choose should be an empty folder on the external hard drive you want to use to back up your data. Anything in the folder you choose will be synced or uploaded to Google Drive, which is the opposite of what you want, so make sure to make a new empty folder for your choice.
Next, go into the Google Drive for Desktop settings and make sure you have “mirrored” files selected. Mirroring means the files are stored in both locations – locally on your external hard drive and online on Google’s servers – and if there’s any file on one location that’s not on the other, it will be downloaded to the mirror.
Now, all you do is wait. Google will mirror the files from Drive to the folder on your external hard drive.
Then, when you’re done with the backup, you can remove your external hard drive and remove or change the Drive for Desktop default folders to remove that folder. Your one-time backup will be complete.
The biggest limitation of this method is that it needs to change what you have set up for normal Google Drive for Desktop operations if you’re normally using it. It also may not work for items in shared drives, and if you’re downloading an extremely large Drive from a Workspace account, it will take a while to get through everything.
Option 5: Using Third-Party Programs
The fifth option I’ll discuss today is using any of a wide range of different third-party apps to do your downloading. There are a bunch of different apps designed either for backing up data or for transferring it between clouds, and most of them offer some option for downloading everything on your Google Drive and putting it anywhere you choose, including on an external hard drive.
I don’t have any specific app recommendations, so just explore what looks good and find one that works for you.
Laying the Groundwork
One piece of advice I highly recommend is to use Filerev to clean up your Google Drive account before downloading it to your external hard drive.
Why?
The more data you’re downloading, the more space it takes up and the longer it will take to download. Nothing is more annoying than spending a lot of time and energy on something only to find you don’t need it, right? Well, if you spend hours downloading terabytes of data that you didn’t actually need, that’s just a waste.
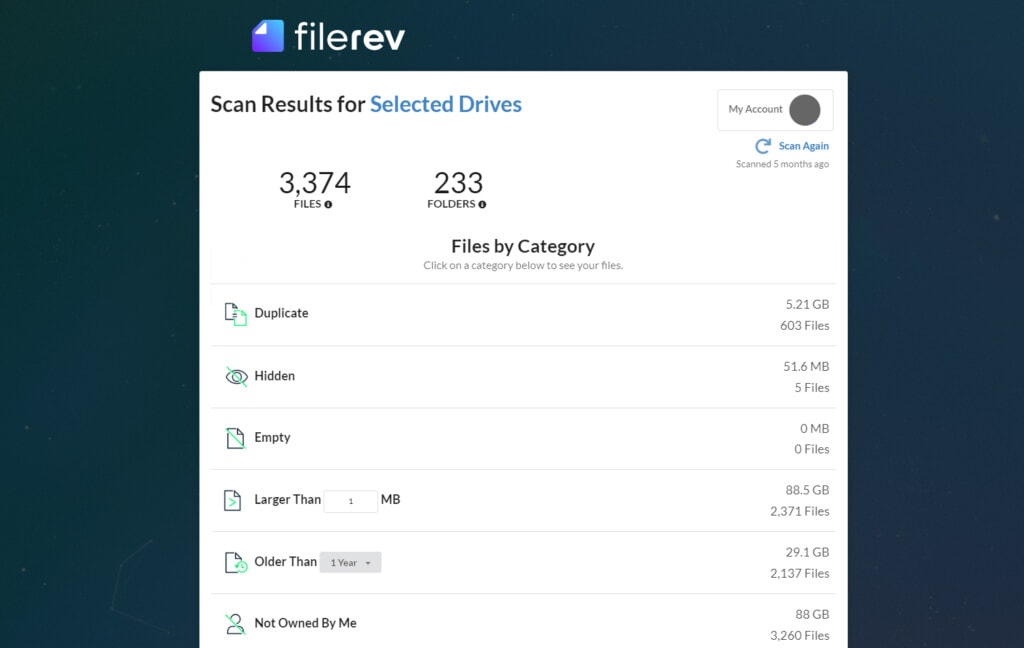
So, use Filerev. It will scan and audit your Google Drive account and give you a comprehensive set of filters to help you identify files you don’t need. Duplicate files, large and outdated files, hidden files, old files; whatever you realize you don’t need anymore, you can clean up with Filerev. Then, you’ll have a smaller, more streamlined Google Drive to download using one of the methods above. What’s not to love? Just click here to get started.
Related Posts
 The Ultimate Guide to Google Drive Data Retention Policies
 Powerful Tool to See Your Google Drive Folder Size
 The Step-by-Step Guide to Back Up Google Drive in 2023
 Step by Step: How to Download an Entire Google Drive Account
 How Do You Copy Files from One Google Drive to Another?
 File Size Limits: What is The Max Upload Size on Google Drive?

