
Storing files in Google Drive is a powerful tool for a variety of purposes, but those files can add up quite quickly. Images – photos in particular, but also image files from graphic design and other sources – can add up fast, and more importantly, they can be quite large.
To help put things into scale here, your average modern, current-gen smartphone takes photos in the 12+ megapixel range. With size resolutions like 3024 x 4032, a single photo taken on a modern phone can be 1-4 megabytes in size.
While that doesn’t seem like much – especially compared to something like videos shot on the same device – there are a few reasons why this can become a much greater problem than you might think.
Why Images Are a Google Drive Issue
Images on their own take up some amount of space, but the true problem with them comes from various factors surrounding images and how they’re used and stored.
First, people generally don’t just take one photo. They take many – half a dozen, a dozen, 50, 100 – and those take up space. When you take several dozen photos at any event that you attend and sync them all with Google Photos or Google Drive, it’s very easy to add up to a lot of space you don’t realize you’re consuming.
Then there’s the fact that different kinds of photos can take up significantly more space.
- Google’s “motion photos” are small video files that “freeze” into a still image at the end; they can be larger than standard image files for the same clarity.
- Similarly, the iPhone HEIC images are small video files, also known as “Live” photos in iOS.
- Panoramic and photosphere photos can be much larger than standard image files, often by ten times or more.
- Image files created by other sources, like a DSLR digital camera, can be even larger; RAW files – those not compressed into a format like JPG – can be 20 megabytes or more.
- Image files created as part of graphic design, specifically very large for-print images, and other formats, can be even larger.
All of this means that images can add up very quickly. The sizes are large enough that you can’t assume you have effectively infinite space like you once could, but at the same time, it’s difficult to even consider space savings when you’re enjoying the moment and saving it for posterity.
So, how can you manage compression, optimization, space savings, and storage for your images without constantly running into Google Drive storage space limits? Here are my top tips.
Use Google’s Native Compression
When you upload a photo to your Google account, you have two options. The first is to upload a file to Google Drive directly. This puts the file in your Drive, where it’s available, just like any other file. It’s saved as-is, and any changes you want to make to it, you need to do yourself.
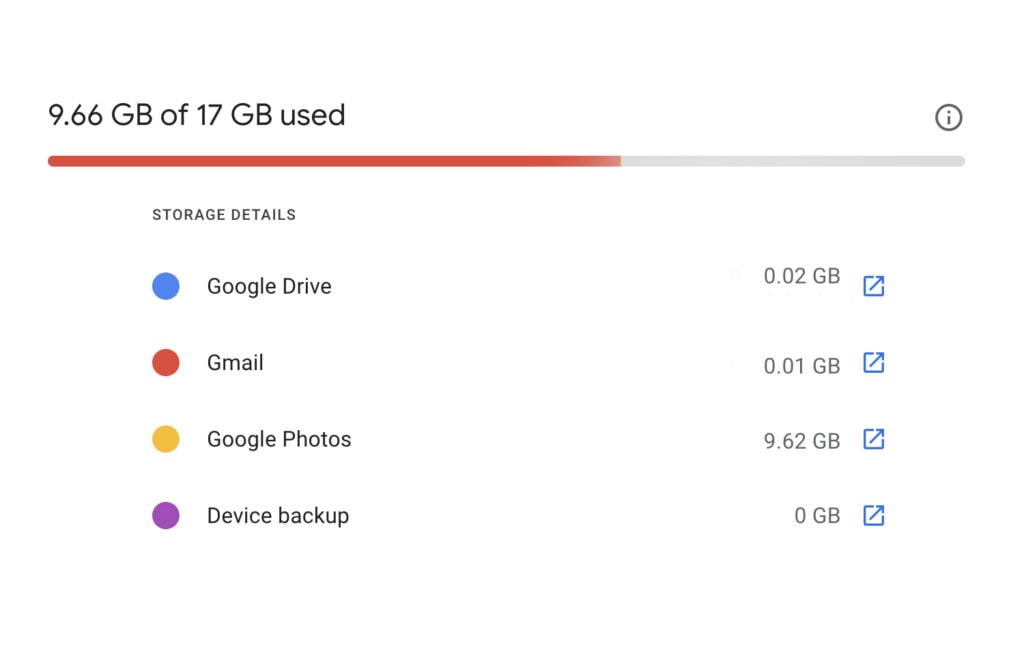
The other option is to upload your photo to Google Photos. Google Photos is slightly disconnected. It still uses your Google Account storage, but it has added tools for image management.
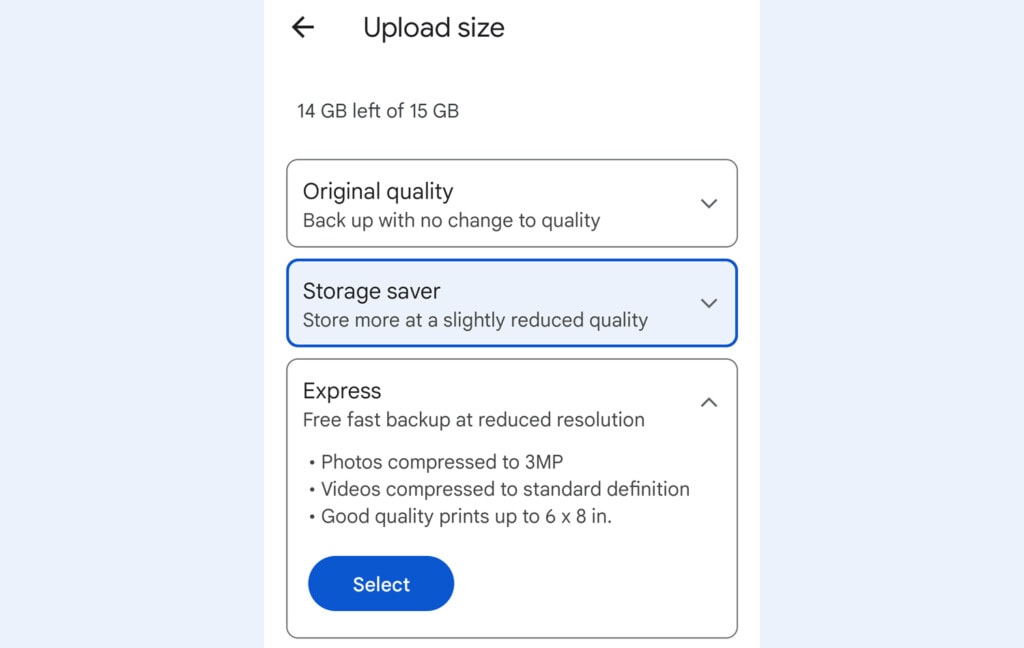
Uploading an image to Google Photos gives you quality and compression options.
- Original Quality. This is the photo, as-is, how it was taken. There’s no compression and no space savings. Google recommends this for files where a high resolution is required and for photos under 16 megapixels.
- Storage Saver. This is some amount of compression applied to photos. The photos are slightly compressed, but it’s mostly a form of compression that operates on the data and not the image itself. That is, you won’t visibly see a difference in the quality of the image, even looking at them side by side, but changes are made that will shrink the file size. For example, changing two nearly identical shades of green into the same share won’t even be perceptible to the human eye, but can save a surprising amount of data. Note that storage saver loses some meta information, but this is usually more relevant for videos than for images.
- Express. Saving photos as express quality will compress them down to 3 megapixels of resolution. This is fine for small photos, old files, and things like internet memes, but it’s not really suitable for modern photography, especially if you’re trying to save high-definition moments.
So, you can choose Storage Saver to compress your images somewhat as you upload them. The kicker to this is that you need to upload them via Google Photos rather than Google Drive, and that means they generally aren’t just sitting there in your Drive to be managed the way you would manage any other files. You need to jump through some hoops, usually.
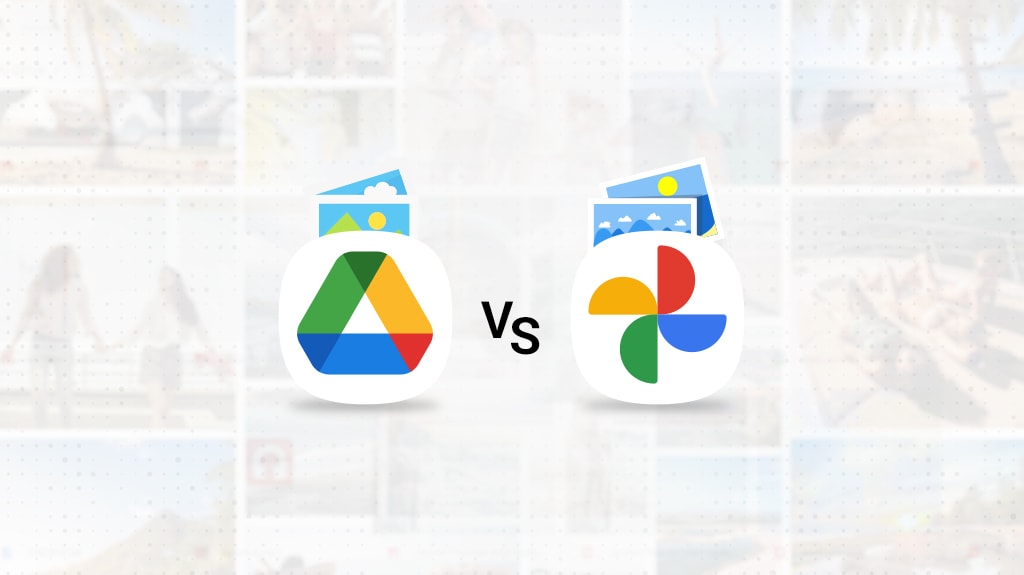
Which is better: Google Drive or Google Photos? When it comes to photos and image files, well, that’s up to you. I go through a full rundown of the differences, caveats, and quirks of both platforms for images in this post.
One final note here, though, is that if you’re uploading your files to a Google account with the intent of accessing the full-resolution version from another source, you need to use either original quality or storage saver. When you choose to back up your photos in “Storage Saver” or “Express,” the compression happens on your end before the image is uploaded to Google. That means that if you try to download the file from another device later, you get the compressed version, and there’s no way to access the uncompressed version without accessing the original device again.
Manually Shrinking and Compressing Images Prior to Uploading
If you don’t want to use Google Photos, or you don’t mind it but you don’t want to use their specific compression algorithm, or if you just want to have more control over your images and their quality, you can do your compression manually before you upload your photos to Google Drive.
There are a lot of different tools available for this. You can open up an image in Adobe Photoshop, run it through a variety of filters and compression algorithms, make edits and resize the image, and save it as a smaller and more compressed file type. Or, on the complete other end of the spectrum, you can use simple apps like Smush It to do a single batch processing to crunch down your images into a smaller, more optimized format with zero hassle but also less configuration.

When compressing images, there are a few different things you can do.
- Reduce the actual dimensions of an image. If the people you’re sending the image to are just going to be browsing it on a phone screen, does it really need to be 3000×4000 pixels? You can cut that in half – reducing image data by 75% — and still have a beautiful image.
- Use a compression algorithm like Smush or TinyPNG to reduce the color depth and file size of images. Consider if you take a picture of a green landscape; there are numerous pixels throughout the image with the RGB value of 30/156/97, and many with 30/156/98. To the human eye, these are identical, so the algorithm simply changes one into the other. It does this for any near-neighbor color values, dramatically reducing the amount of data a file needs to store. This is a simplification of the process, of course, but it can show you how there can be much less data to track in an image file.
- Cropping the image. Similar to reducing the dimensions of an image, cropping cuts out the background and unnecessary elements, reducing the overall size of the image. This is a manual process, though; you need to decide what the focal point of the image is, what the crop should be, and more.
- Removing metadata. Photos, especially those captured on the phone, often have additional meta information, such as the GPS location where the photo was taken and information about the user and device that took it, which can be stripped out as unnecessary.
- Changing the file type. Some file types, like JPG and PNG, and modern versions like WEBP, are all designed with space-saving algorithms in mind and can be much smaller than older formats, RAW files, and other such larger images. Note that you only want to use this option if you don’t need the raw file, of course.
Doing some or all of these steps can reduce an image file from a space-hogging monster into something much more manageable, and you can store hundreds of times more images.
Of course, the trade-off is the loss of depth and quality. Depending on how aggressive your compression is, you can lose a lot, and in fact, unless you keep an original version somewhere, that data is lost forever. You can never un-crop or un-compress an image.
Other Ways to Save Space with Images in Google Drive
Compressing images isn’t the only way to save space. There are a few other things you can do to help out.
First, you can be more selective with what you upload. Sure, taking photos and documenting your child’s first softball game can be a heartwarming experience, and you want to save those memories forever. But do you really need a photo of every pitch they threw all game? Maybe you can pick the best one, or two, or five, and save those, and simply not upload the rest. This is also a good tip if you use rapid fire or burst mode for photography, which allows your camera to take numerous rapid shots of a moment of action so you can pick the best one. Do that! Pick the best one to upload, and get rid of the rest.
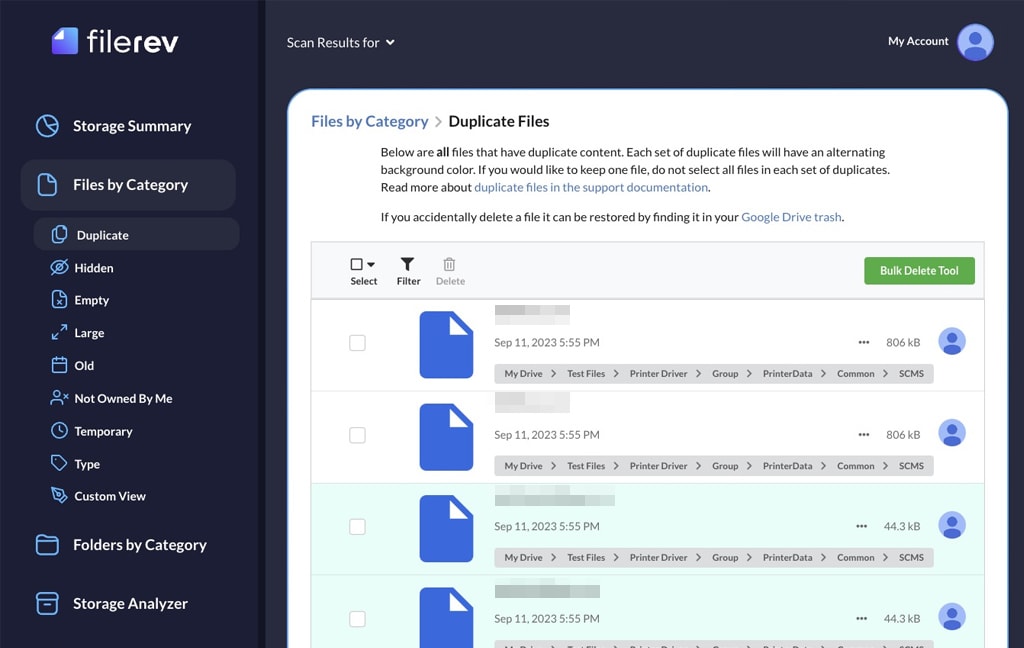
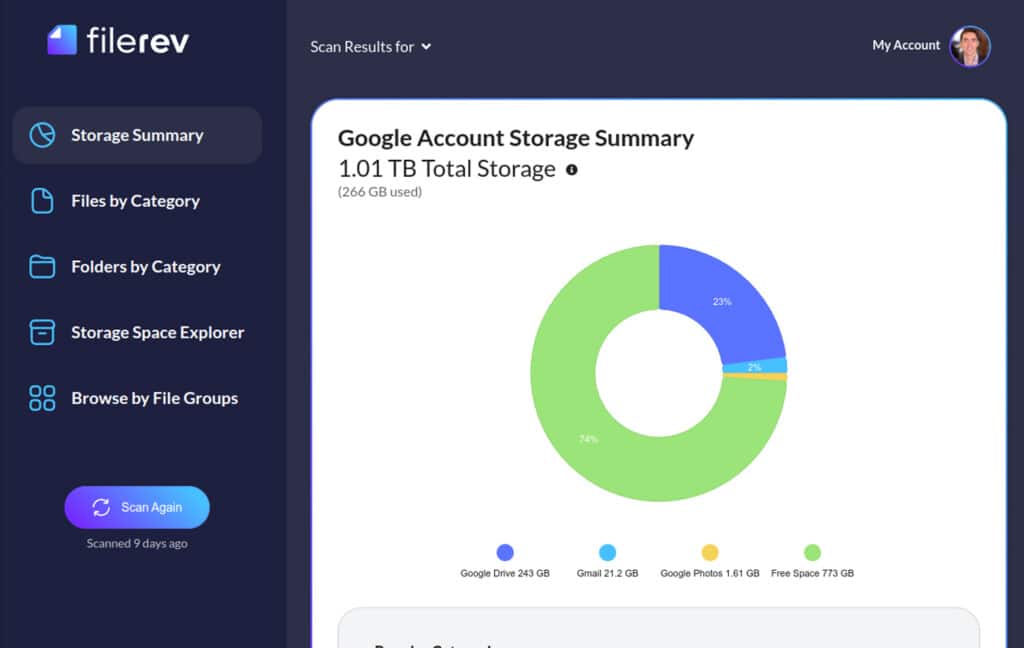
Second, you can work to avoid duplicate uploads. One of the most insidious ways images take up space is when you upload everything you have in a batch to back it all up; doing this on a regular basis can leave you with numerous copies of the same photos spread throughout different locations on your Google account, and it can be hard to detect, especially if you’re using both Google Drive and Google Photos. You can use Filerev to help you identify duplicate files throughout your Google account and get rid of all but one, however.
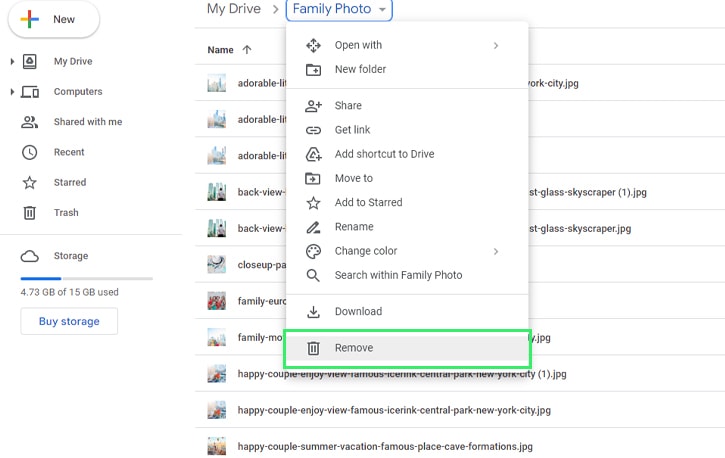
Third, you can periodically re-evaluate and remove images you don’t need. Maybe you have shared them with the people you wanted to share them with. Maybe the project you were working on is over or canceled, and you no longer need them. Maybe you’ve transferred them to a more permanent backup and archive solution and don’t need them stored on Google. Maybe you even printed them out. Whatever the case, if you don’t still need them on Drive, you can get rid of them.
Next, you can also purge attachment versions of the files. If you use Gmail or GChat to send images to friends and family – and you aren’t just sending them a link to the image on Google Drive – those copies of those images are also stored and taking up space on your Google account. Again, you can use Filerev to find these attachments and duplicates and get rid of them.
Finally, if you’re just planning to use Google Drive to store the images indefinitely, and you want them backed up but don’t need them individually accessible, one thing you can do is archive them.
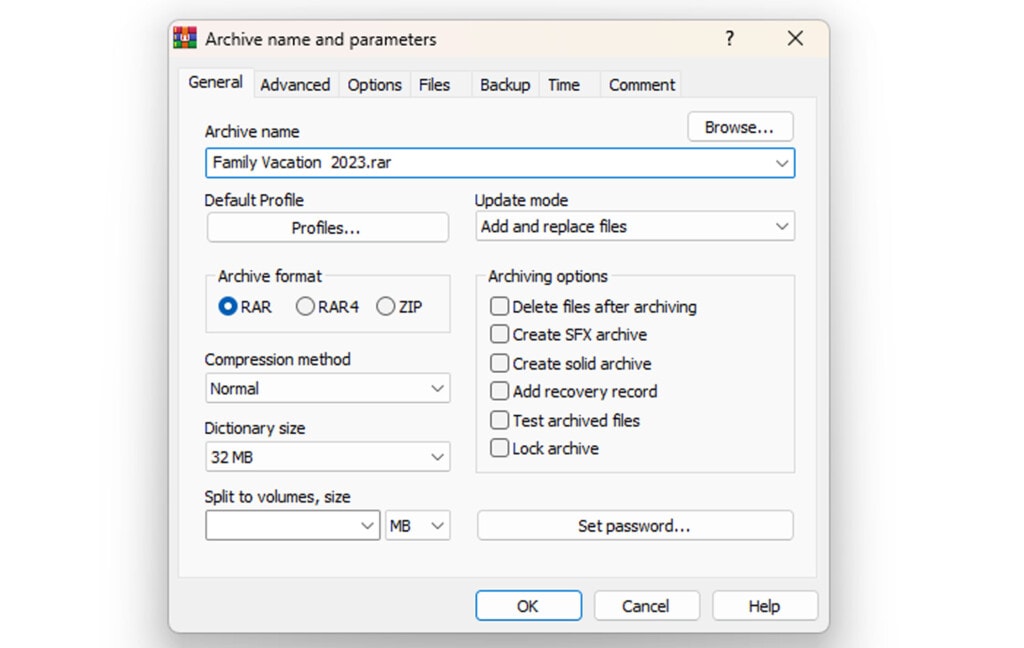
The process is pretty easy:
- Organize files into groups, like all of the images from a given event.
- Put the images of that group into a folder and give the folder a descriptive name.
- Use the built-in utility on your computer to compress and add the files to an archive. Choose a good compression level to save the most space. Alternatively, use a third-party utility like WinRAR or IzArc to do the compression.
- Upload the resulting zipped or compressed file to Drive in place of all of the individual files.
I have a more complete guide to using Zip files with Google Drive over here.
Once all of this is done, you should be able to clear out a lot of space on your Google Drive. From there, it’s all about building good habits and making sure you don’t need to go back in and clean up everything again.
Related Posts
 Powerful Tool to See Your Google Drive Folder Size
 File Size Limits: What is The Max Upload Size on Google Drive?
 FAQ: What Happens When Your Google Drive Storage is Full?
 Organizing Google Drive: 16 Tips to Clean and Audit Your Files
 How to Reduce Google Drive Storage and Organize Your Files
 How to Copy ‘Shared With Me’ Files Between Google Drives

