
If you’re switching from OneDrive – transferring your precious pictures is easier than you think.
Google Drive organization means your photos are always easy to find. And moving from OneDrive is not a change of scenery – it’s a step up in how you store and engage with your memories. Once you’re settled in, look around; Google Drive has plenty more tricks to improve your photo management.
Let’s talk about how to move your photos safely and get them safe and sound on Google Drive!
First: Plan Your Move
Let’s kick things off by simplifying the way you sort your OneDrive pictures. Pin down the ones that really matter to keep things tidy and easy when you switch over.
It’s a good time to toss out any you no longer need, which makes your space as fresh as possible.
Next, look at the space you have in Google Drive. You start off with a free 15GB of all Google software, which includes your photos. Is that enough for your picture collection, or should you upgrade your plan a bit to make room for more?

Make sure your photos, like the usual JPEGs and PNGs, play nice with Google Drive. This will help you swap them over without any issues.
Have thousands of photos? The OneDrive and Google Drive apps on your computer are built to shift big batches without a hitch, taking the load off your browser.
It’s a good idea to back up your photos before you get started – think of it as an insurance policy for your treasured snapshots.
Keep in mind, Google Photos and Drive may not team up and sync on their own. In this case, you’ll be rolling up your sleeves for the manual upload, so be sure your internet is ready to take on the job.
The switch from OneDrive to Google Drive can actually smooth out your photo-organizing process. With a little prep, you’re turning what could be a headache into very easy.
Optional: Compress Photos Before Moving
Before you shift your photos to Google Drive from OneDrive, try making them smaller first. What’s more, small files are quicker to upload and easier to manage. By doing this simple thing, you save both time and money.
You’re moving all of your photos anyway, and it’s not much extra work, so why not do this first? You may thank yourself later!
This also means saving money. And that’s pretty important when you have loads of photos; a little effort here can mean big savings on your storage costs. Less storage can lead to using less energy, which is better for the planet, and smaller photo sizes help to reduce your change.
There are a few ways to do this. You can compress photos manually, but if you have hundreds or thousands of them, it’s not very practical, is it?
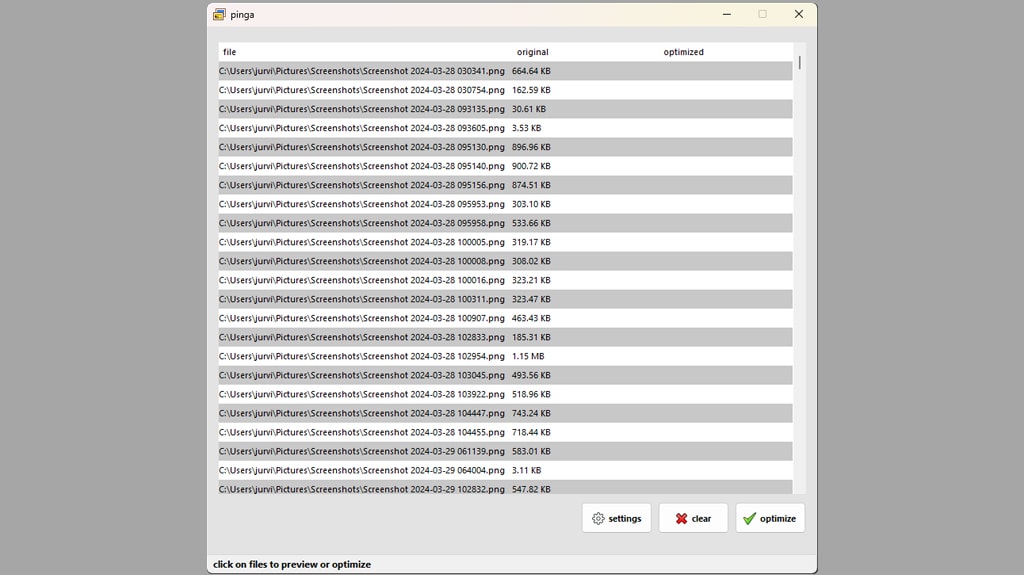
Thankfully, you can also use some easy-to-use software to shrink your files in bulk without losing quality. Options like Caesium for Windows or Mac, ImageOptim for Mac and pinga for windows can let you optimize thousands or even tens of thousands of photos quickly and keep them looking good. I love both of these; you drag and drop your photos, and it immediately saves you anywhere from 20% to 90% storage without affecting the quality at all! It’s incredible.
Also, the format in which you save your photos can make a difference. JPEG is great for keeping the file size down without ruining the picture quality. But if you need transparent backgrounds, PNG is your friend, even if the files are a bit bigger. So, choosing the right format is definitely smart. I recommend avoiding PNG whenever possible; the file size is quite a bit bigger.
It’s also a good plan to scale your photos to sizes that are friendly for browsing online. Most pictures are totally fine at less than 1920 pixels wide – no need to lose quality to keep things moving smoothly.
But still, even with all this image compressing, remember to backup your original photos. It’s important to keep copies to prevent any loss, which makes sure your memories and important photos are secure.
Method #1: Manual Download and Upload
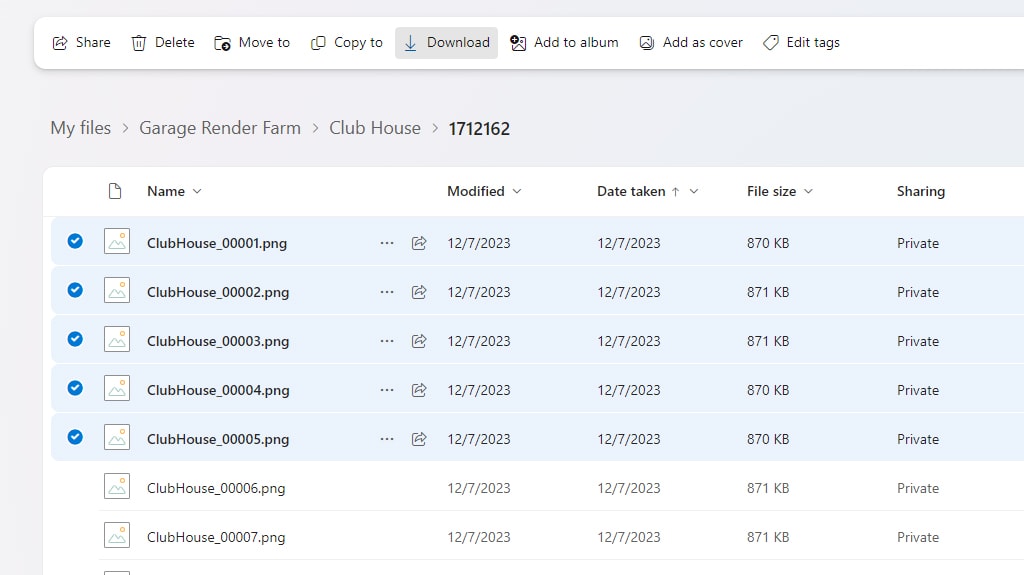
To manually move your pictures from OneDrive to Google Drive, first go to the OneDrive website and sign in.
Look for the pictures you want to take. To choose more than one, hold down the Ctrl important – or Cmd important if you’re on a Mac – and click on the photos. Then, click “Download.” Your pictures will be packed together and start downloading. Save this zip file somewhere easy to find on your computer.
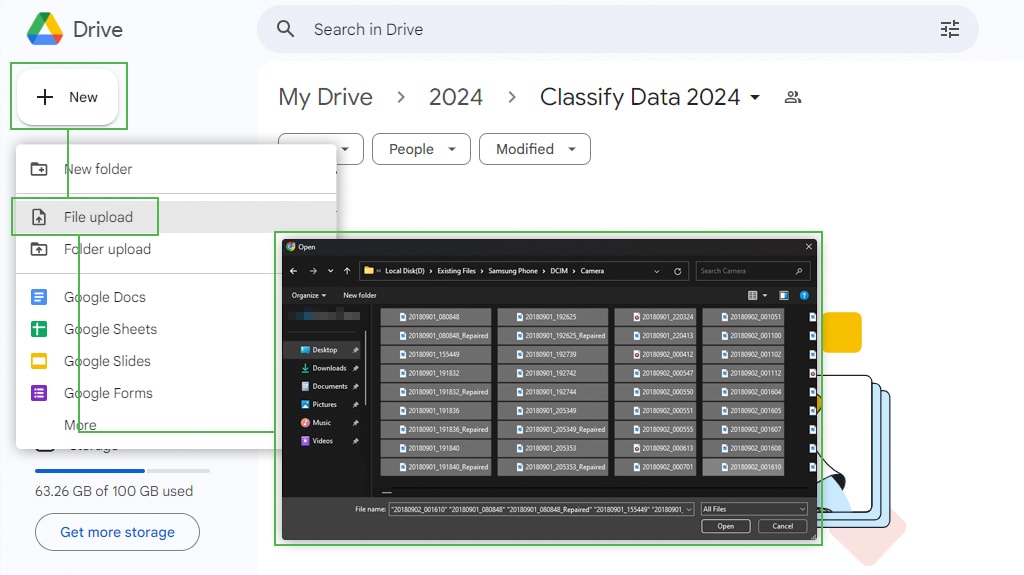
Next, go to Google Drive in a new browser tab. Click on “New.” Here, you can pick “File upload” for single photos or “Folder upload” to move lots of them at once. Before uploading, it’s a good idea to unzip your files into a folder.
How fast this goes depends on your internet connection; you need a good internet connection to avoid problems, especially if you have a ton of photos.
Once you’ve moved your pictures to Google Drive, organize them – think about it like putting them into albums and folders. This makes it easier to find them later.
Make sure all your pictures are taken to Google Drive. Check that everything in your Google Drive folders matches what’s in your OneDrive folders. You don’t want to lose any precious memories. When you’re sure nothing’s missing, then you can think about clearing them from OneDrive. Remember, I’m talking about moving data; it’s about keeping your special moments safe.
Method #2: Use The Desktop Applications and Sync
You can also use desktop applications to sync one application to another. First up, head over to the official sites and get the OneDrive desktop app and Google Drive’s Backup and Sync. Make sure they’re compatible with your computer.
Also, make sure that Google Drive has “Mirroring” enabled so that the files are actually stored on our hard drive.
Note: This can take up a lot of space on your hard drive; I wrote a guide about the differences between streaming and mirroring here.
Once you’ve set up the apps, use your Microsoft and Google details to sign in.
Let’s get to the exciting part: making your photos show up in both places. Go to the OneDrive app’s settings, choose which photo folder you want, and your computer will start bringing these pictures over. Remember to line up all your photo folders for this.
Then, head to Google Drive. Look for the OneDrive folder on your computer where your lovely photos now are. It’s your choice: drag and drop them or go with the old copy-and-paste method.
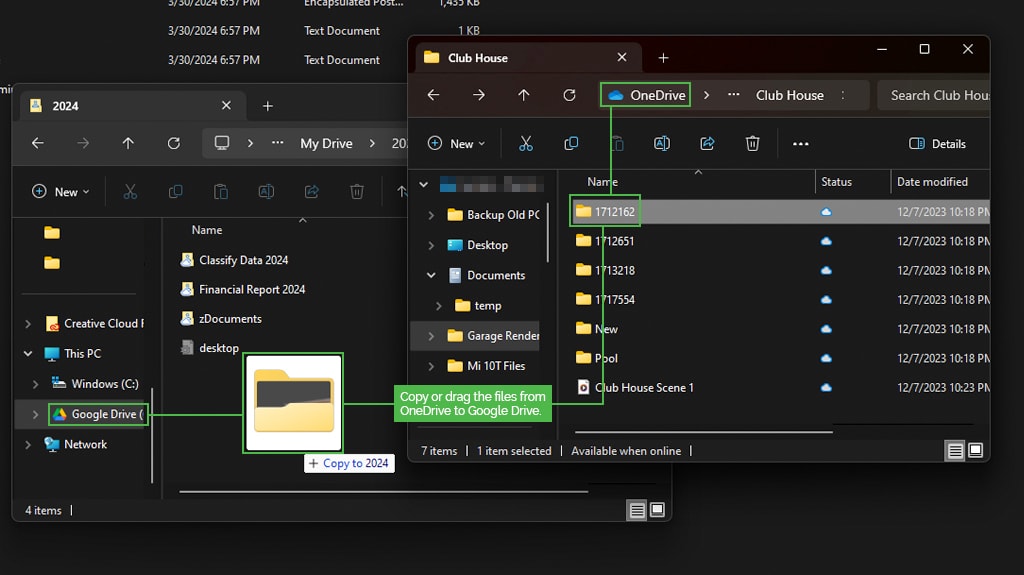
After you’ve placed your pictures in the Google Drive folder, they’ll begin to upload on their own. The time this takes depends on how many pictures you have and your internet connection speed.
Next, open Google Drive in your browser to make sure your pictures made the trip successful.
Before you jump in, check how much space you have on your computer and Google Drive. It’s important so that you don’t hit any bumps along the way. Loads of photos mean a bit of a wait to sync up, so sit tight.
Method #3: Third-Party Cloud Management Tools
If you need to move your photos from OneDrive to Google Drive, there’s a simple way to do it. You can use tools that are easy to know and will handle your data with care.
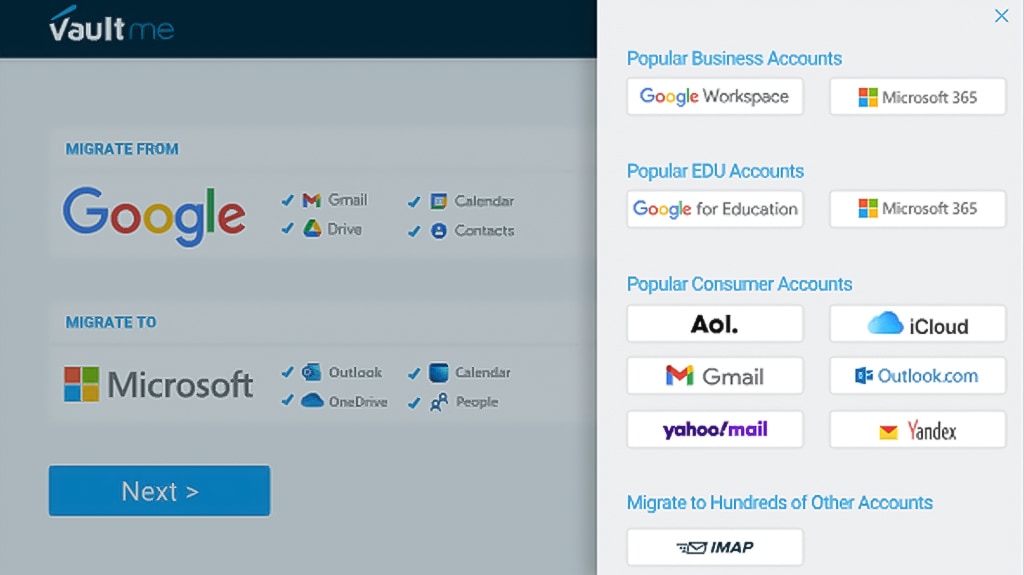
Think about trying VaultMe if you like things to be hassle-free. It’s like setting up a crockpot: once you start it, it does its thing while you go about your day. Your folders will stay just as you’ve organized them, and you won’t even notice the files moving.
If you want to keep a hands-on technique, check out MultCloud. It’s convenient because you don’t need to have your computer on for it to work. Also, you can plan your photo move around your own schedule, and it works with lots of other storage places, like Google Drive and OneDrive.
CloudMounter is another option that brings your cloud storage right to your computer, which makes it as easy as moving files around on your desktop.
For those using different devices and computers, Insync is super helpful. It works with Linux, Windows, and macOS and makes it really easy to get your files where they need to go without a fuss.
And if you want something simple, give Wondershare InClowdz a look. It’s really simple to use and makes moving different types of files very easy.
The right tool can make switching from OneDrive to Google Drive easy and smooth. Once you’ve moved your photos, organizing them in their new place will help make sure they’re a click away and safe.
Organize Your Photos in Google Drive
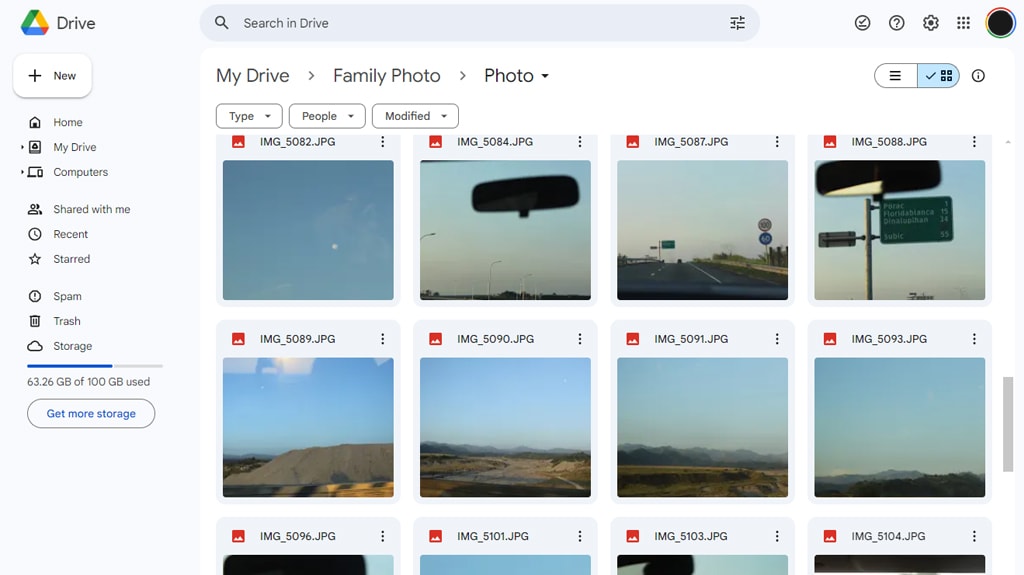
Clean up your photo stash in Google Drive by making easy-to-browse albums. Start with albums named for events, dates, or themes, so you know at a glance what’s inside.
Click that “+ New” button and pick “File upload” to pepper your albums with pictures.
While you’re sorting your Drive, whip up folders to keep albums and files in line. This way, everything’s tidy and very easy to find. Slide pictures around or sort them by date to tell your story in order. Updating album titles and details? That’s important for a smooth search later.
Also, sharing albums from Google Drive is pretty simple – you choose who gets a peek. In search of a particular photo? Google’s search bar is your useful sidekick, getting you there effectively.
Are you thinking about getting rid of an old album? Hold up; remember, those moments are precious. Protect your photos with backup tools like PicBackMan for automatic saving, so you never have to worry about losing them.
If you switch between Google Drive and Google Photos, check out Google Drive for Desktop to keep your things synced up. Keep an eye on your storage with the “Storage” view and sort by size to stay on top of things. And when you feel nostalgic, the “Sort Photos” option helps you weave the perfect story from your pictures. Just keep an eye on your space to keep everything running smoothly.
Verify Your Photos Transferred Successfully
Moving pictures from your OneDrive over to Google Drive can really be very easy, believe it or not! Here’s how to do it.
Start by making sure you have all your photos accounted for in both places. It’s important – no photo left behind, right? Glance over the file sizes. If there’s a big difference, you might want to double-check – just to be sure.
The next step is to peek at a couple of photos at random to confirm they look okay. During the upload to Google Drive, keep an eye out for any unusual alerts. These could be clues that something didn’t go quite right. Found a photo missing? Circle back to OneDrive just to be certain it wasn’t ignored.
If you stumble upon a corrupted file, no sweat; just try re-uploading it. Oh, and check your Google Drive space – you might need a bit more.
Is the Internet connection shaky? You’ll need a solid connection for this – so maybe switch to something more reliable before continuing the upload. And did you know there are tools out there specifically designed to make moving your things across different cloud services a whole lot easier? Definitely worth a look!
Hit a snag? The support forums for Google Drive and OneDrive are a great source of tips, and their customer service is there to help, too.
Keep Your Google Drive Clean and Organized
Your photos online deserve a simple place to call home, and moving them from OneDrive to Google Drive is really just the beginning. But I know what you’re thinking: it’s about more than moving things around. It’s about creating a space where you can find any photo you need quickly and without hassle.
Let’s take a look at your current Google Drive setup. Is it easy to find what you’re looking for? If not, you might want to think about organizing it better. A tidy drive means you can find your photos fast and avoid getting lost in clutter, which is, honestly, incredible for your peace of mind.
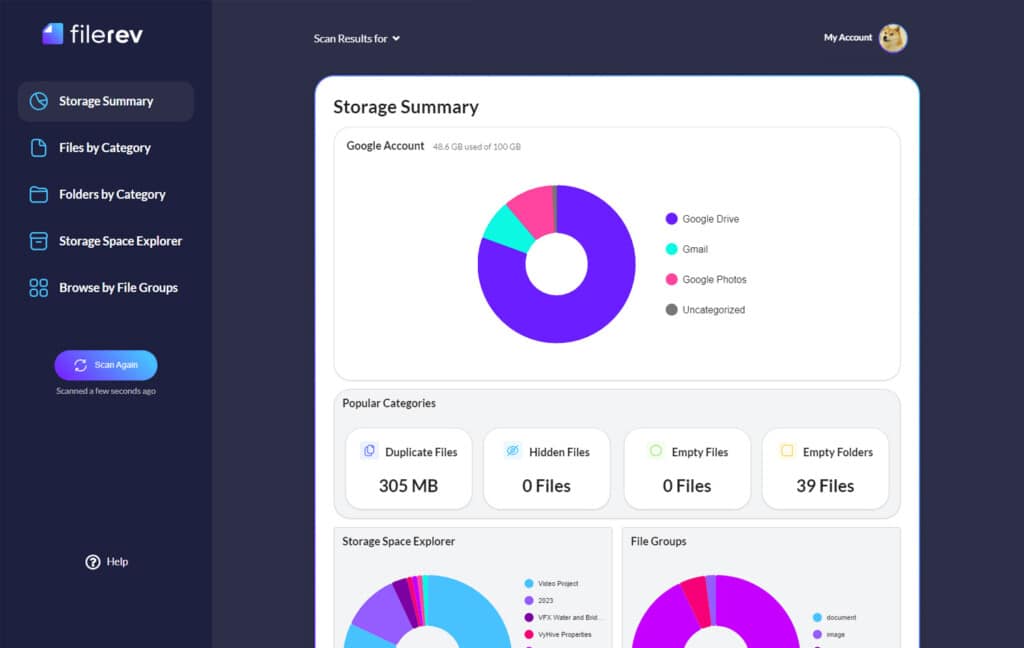
I’d love to introduce you to something I’ve come up with called Filerev. It’s a tool I’ve specifically designed to help keep your online photos organized. By working with Google Drive’s own system, Filerev makes your storage space super efficient, adding quick clean-up options and helping you keep track of every file. Imagine having a helper by your side making sure everything stays perfectly placed – that’s Filerev for you.
Give Filerev a try, and you’ll see how it can change the way you handle your files. You’ll spend less time searching and more time enjoying your well-organized photo collection.
Related Posts
 Powerful Tool to See Your Google Drive Folder Size
 How to Reduce Google Drive Storage and Organize Your Files
 File Size Limits: What is The Max Upload Size on Google Drive?
 How to Copy ‘Shared With Me’ Files Between Google Drives
 FAQ: What Happens When Your Google Drive Storage is Full?
 Google Drive vs Google Photos: Which Is Best for Photo Storage?

