Google Drive is a fantastic tool for collaboration, both within an organization and with the general public. It’s also an excellent way to distribute a document or file to an audience; it’s essentially free hosting as long as the file doesn’t violate any of Google’s copyright or IP rules, content guidelines, or other policies.
Of course, to share a file with your audience, you need to be able to make it public. How do you do that?
There are many ways, some of which have limitations, security concerns, or drawbacks. Let’s break down each to learn how to share them and which method is best for your files.
Decide on Sharing Permissions
Before you share any file, decide on what level of permissions you want other people to have.
If you’re sharing a file with a couple of collaborators, then there may be better ideas than making the file fully public.
Instead, you can give specific individuals editing rights to the file while keeping it locked to other users.
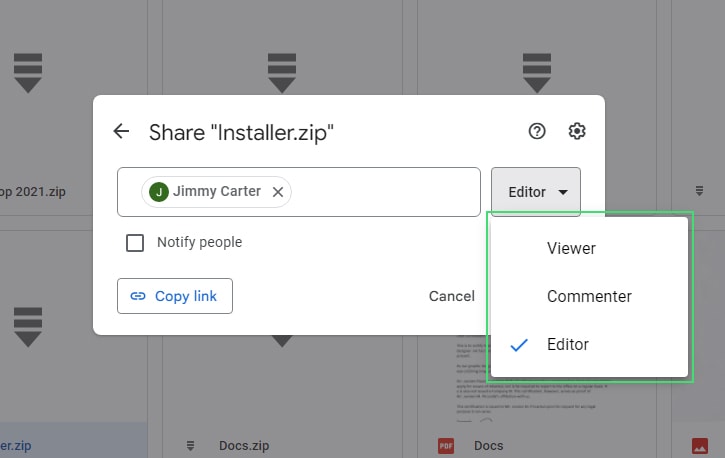
Google Drive offers three roles: generally, the best option is to provide the file in read-only mode, but if you still want to invite feedback, you might use a different role:
- Viewer. Anyone who has the link to the file or can view it through another venue, such as a document embed, can see the file. They can make their copy of the file to edit and share or share the link they were given to see it in the first place. However, they cannot edit the file, and they cannot share the file with others through Google’s sharing system.
- Commenter. Anyone with the commenter role can view the file but cannot edit it. Instead, they can use the built-in comment feature to leave comments on the document. This feature only applies to files with collaborative editing systems with Google, such as Google Sheets and Docs, so most of your Drive files won’t qualify for this role.
- Editor. Anyone with access to the file can edit it and make changes, accept or reject comments and suggestions, or share the file with other people. This role is as close to complete owner access as possible; the only thing they can’t do that you can do is change sharing permissions.
If you’re making a file public, chances are you want a viewer role attached. Otherwise, who knows what random people on the internet might do to your file? In some collaborative settings, you may wish to grant a commenter or editor role to anyone who can access the file, but you’ll probably know when those situations arise.
It’s very easy to accidentally leak sensitive information outside of a company or an organization. For example, if your files and folders are shared with somebody who is no longer an employee of your organization, or if you allow anybody to edit a document for convenience, you may have a security issue on your hands.
![]() Note: Be cautious about who you assign an Editor, as they can delete some or even all of your document if they wish.
Note: Be cautious about who you assign an Editor, as they can delete some or even all of your document if they wish.
If you’re interested in auditing your publicly shared files in bulk to see who has access to your sensitive files and folders, we’re close to launching a new feature that streamlines this process! If you’re interested, sign up for notifications, and we’ll send you an email when this feature is ready to use:
Pick an Access Level
Since we’re talking about sharing a file with the public today, I’m assuming you want your file to be public.
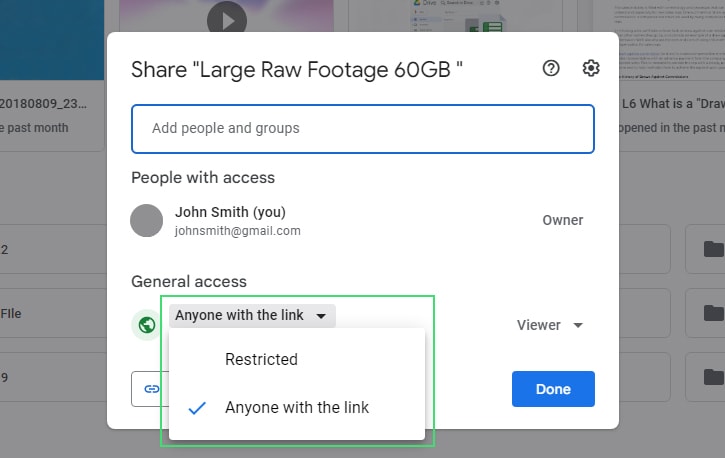
This setting is one of the three permission levels Google Drive and Google Docs allow you to set.
- Public: Your file is freely available and searchable. People on Google can find it, and no one needs a Google account signed in to see the file. This setting is the broadest access possible.
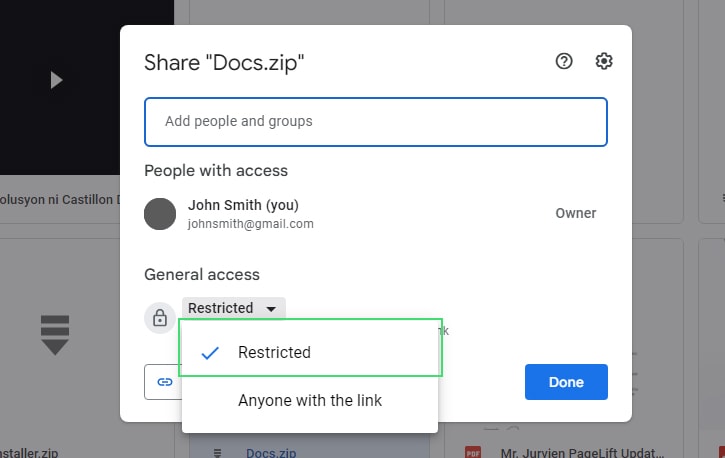
- Anyone with the link: Your file is available to anyone who has a link to the file. However, the file isn’t indexed in Google’s search and can only be located with the link to that file. Anyone who has the link can share the link, though, so it can be challenging to control the spread. For example, if somebody shares it on Reddit or in a forum post, that link is no longer private, and random visitors will have access to your file. This scenario can be a recipe for disaster if you allow anybody with the link to edit your file. It’s best not to use this option for sensitive or private information.
- Restricted: Only the people you directly add to the file permissions list can access the file. A user who wants to access the file must be signed into the appropriate Google account to access the file. Any email that wasn’t explicitly added as an authorized user will be unable to access your file. However, they will also have the option to request access, and you can review all users that have asked to be added to your file to grant or deny those requests.
When your file is publicly visible or visible to anyone with a link, you will likely see “anonymous animals” accessing the file. These generic avatar images serve as Google’s acknowledgment of privacy. Anyone who accesses a public Google Drive or Google Docs file will show in the list of active users accessing the file.
But, to prevent names and other information from being visible to all users on the internet, they appear as animals. You’ll see things like Anonymous Aardvark and Anonymous Elephant accessing your file rather than the names and photos of the people involved.
Make a File Public from the Web
The web interface is the most common way people access Google services, including Drive, Docs, Sheets, and Slides. It’s also relatively easy to make a file publicly visible for sharing purposes.
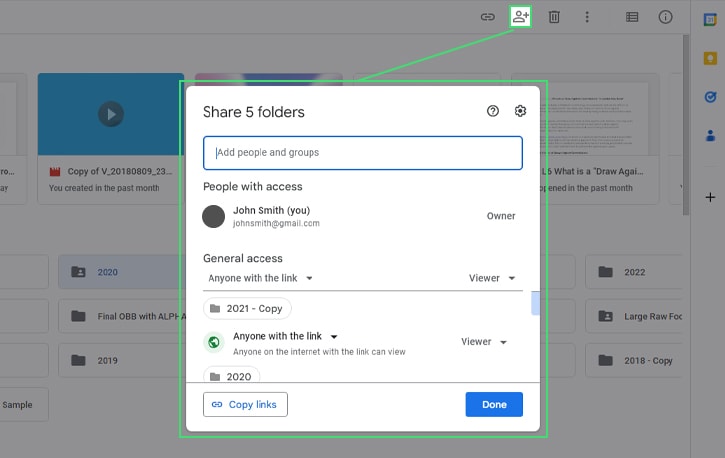
To begin, go to the relevant Google app. You can go to drive.google.com and share any file saved to your Google account, or you can go to Google Docs, Google Sheets, or another Google service and share a particular file from there. Either way, find the file you want to share.
![]() Pro Tip: If you want to share more than one file at once, you can also do that easily. Click on one file, hold Shift, and click on another to select all files between those two files. Alternatively, hold Ctrl and click on each file you want to share.
Pro Tip: If you want to share more than one file at once, you can also do that easily. Click on one file, hold Shift, and click on another to select all files between those two files. Alternatively, hold Ctrl and click on each file you want to share.
Once the file or files you want to share have been selected, look in the screen’s upper-right corner, where the row of icons sits. You’re looking for the one that looks like a silhouette with a + next to it; this is the Share button. Click it, and Google will pop up a window asking you for your desired access settings.
Then, copy your link(s) and send them to the individual(s) that you’d like to share those files with.
![]() Pro Tip #2: Once you have your shared link copied to your clipboard, you can add /copy to the end of the URL to make it much easier for the people you share your files with. Instead of your invitees having to conclude that the file isn’t editable and that they have to figure out how to save a copy, they’re presented with a “Make a Copy” button as soon as they click it. It’s very convenient!
Pro Tip #2: Once you have your shared link copied to your clipboard, you can add /copy to the end of the URL to make it much easier for the people you share your files with. Instead of your invitees having to conclude that the file isn’t editable and that they have to figure out how to save a copy, they’re presented with a “Make a Copy” button as soon as they click it. It’s very convenient!
Make a File Public from Google Drive for Desktop
If you have Google Drive installed on your computer, either as a mounted drive on Windows or added to Finder on MacOS, you can share a file directly from your computer.
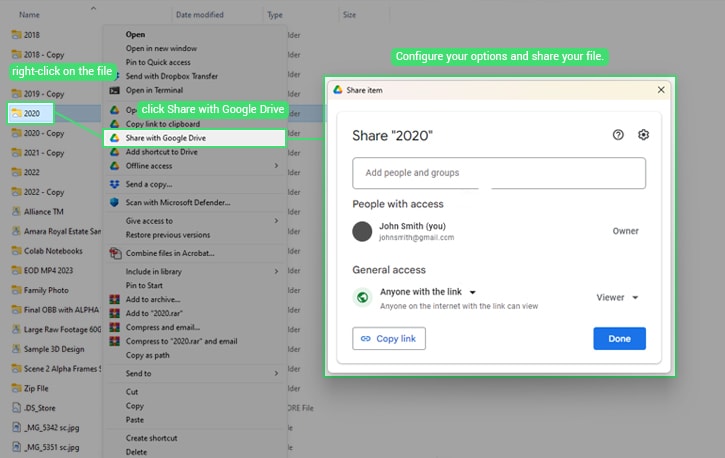
To do this:
- Start by opening up Windows Explorer or Finder, as appropriate.
- Find the Drive Google added to your computer, and open it.
- Locate the file or files you want to share, and select them.
- Next, right-click on the file. One of the items in your context menu should be “Share with Google Drive.” Clicking this will bring up the same options menu for choosing sharing permissions as the last option where you click the share button.
- Configure your options and save your changes to share your file.
Any sharing changes made on your computer will be visible on the Google Drive web app and other synced devices.
Make a File Public from an Android Device
Similar sharing instructions work for accessing Google services on an Android device. Android devices generally come with Google apps pre-installed. So, to share a file, find the Drive, Docs, Sheets, or Slides app where appropriate.
Make sure you’re signed into the correct Google account, open the app, and find the file you want to share.
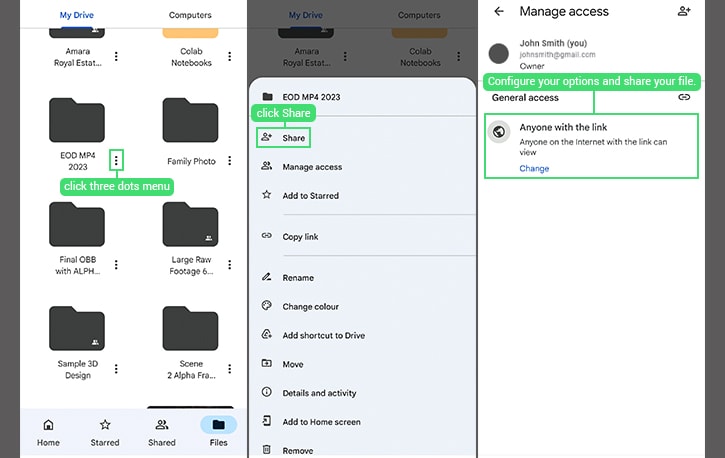
Next to the name of the file you want to share, you’ll see the three dots menu (⋮). Click that menu to open options for the file. One of the options is “share”; click it and set your configuration options, save them, and your file will be public.
![]() Note: You can’t select more than one file on Android to share them all at once. Instead, you will need to add each item you want to share into a folder and then share the folder as a whole. Unfortunately, if you wish to maintain folder structure or keep the files separate but change their permissions in bulk, there’s no easy way.
Note: You can’t select more than one file on Android to share them all at once. Instead, you will need to add each item you want to share into a folder and then share the folder as a whole. Unfortunately, if you wish to maintain folder structure or keep the files separate but change their permissions in bulk, there’s no easy way.
Make a File Public from an iOS Device
Similar sharing instructions work for accessing Google services on an iOS (iPad or iPhone) device.
Apple/iOS devices will require you to locate and install the relevant Google app. For example, here’s Google Drive. Once you have installed the app and logged into your Google account, you can access your Drive and share files. To share a file, ensure you’re signed into the correct Google account, open the app, and find the file you want to share.
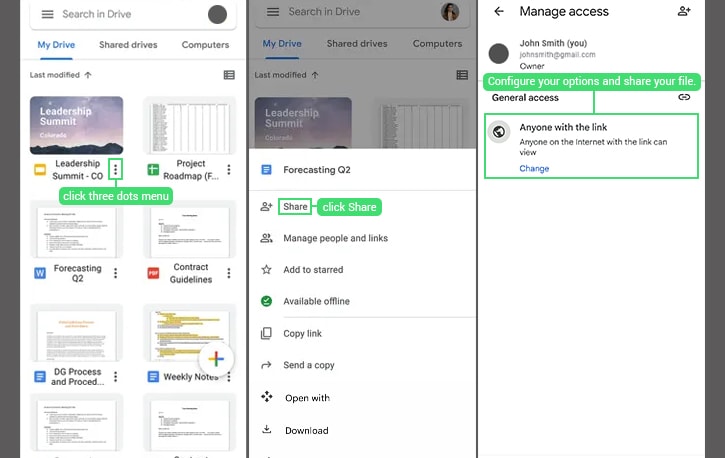
Next to the name of the file you want to share, you’ll see the three dots menu (⋮). Click that menu to open options for the file. One of the options is “share”; click it and set your configuration options, save them, and your file will be public.
![]() Note: You can’t select more than one file on iOS to share them all at once. Like Android devices, you will need to add each item you want to share into a folder and then share the folder as a whole. Unfortunately, if you wish to maintain folder structure or keep the files separate but change their permissions in bulk, there’s no easy way.
Note: You can’t select more than one file on iOS to share them all at once. Like Android devices, you will need to add each item you want to share into a folder and then share the folder as a whole. Unfortunately, if you wish to maintain folder structure or keep the files separate but change their permissions in bulk, there’s no easy way.
Collaborating With a Wider Audience
If you want your file to be broadly accessible to a large audience, you may not be able to achieve what you want by sharing alone. Google places a limit of around 100 users opening and editing a file at any time. If you exceed that number of active users, Google will restrict who can edit the file, and some visitors may see errors or be unable to view the file. The solution to this is to publish the file.
Publishing a file to the web is like sharing, but different on the back end. Rather than taking the file in your Drive and making it broadly accessible, publishing the file essentially makes a copy of the file that anyone with access. You can easily publish a file using the relevant web app or Google Drive.
![]() Note: Google’s support center mentioned that published documents are editable, but I couldn’t replicate this. Only read-only publishing is possible. It may be that Google removed editing capabilities; if you can edit your docs after publishing them, please let me know in the comments!
Note: Google’s support center mentioned that published documents are editable, but I couldn’t replicate this. Only read-only publishing is possible. It may be that Google removed editing capabilities; if you can edit your docs after publishing them, please let me know in the comments!
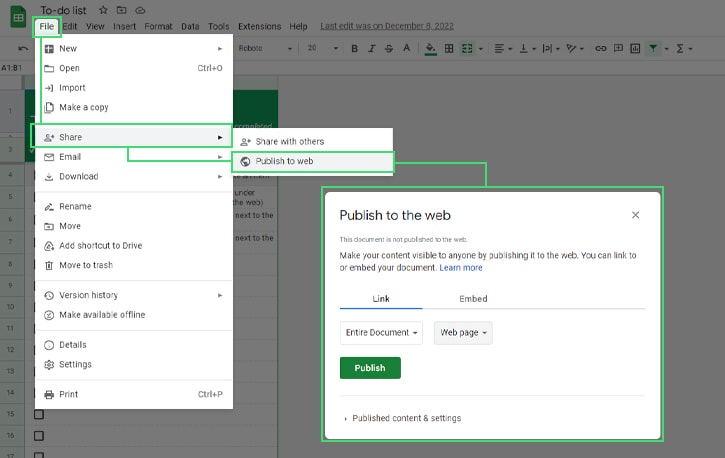
So, to publish a Google Doc, you need to open it up in docs.google.com (you’re currently unable to do this via Drive for Desktop, Android, or iOS devices; you must do this on the website.) It’s still a mirror of your file, so any changes you make to the original will be reflected in the published version (and vice versa.)
![]() Note: If you publish a chart, the data used to generate the chart will be visible as well. That means you need to exercise proper data security with data that might include sensitive info. Use a pruned, anonymized, or otherwise privatized data set as necessary.
Note: If you publish a chart, the data used to generate the chart will be visible as well. That means you need to exercise proper data security with data that might include sensitive info. Use a pruned, anonymized, or otherwise privatized data set as necessary.
To publish a file, open the file in the relevant Google service. In the options menu at the top of the screen, click File, Share, then Publish to Web. In the case of spreadsheets and slideshows, you can configure specific options here, like how quickly slides advance or whether you’re publishing just one sheet or a whole spreadsheet.
![]() Note: To publish a file directly from drive.google.com, you must ensure that publication is enabled on your Drive account. On your shared Drive, click the down arrow, and click Shared Drive Settings. Click Edit next to “sharing with non-members” and enable sharing with non-members.
Note: To publish a file directly from drive.google.com, you must ensure that publication is enabled on your Drive account. On your shared Drive, click the down arrow, and click Shared Drive Settings. Click Edit next to “sharing with non-members” and enable sharing with non-members.
Once you click Publish, you will be given a URL you can share, just like a file shared via a link from Google Drive.
Alternatively, you can generate an embed code. Instead of clicking to share, click the Embed button, and configure your options there.
This option will generate a block of HTML code rather than a link; you can then use that code on a Google Site or your website to embed the document, spreadsheet, or slideshow directly on the web.
Any time you decide you don’t want a file to be accessible to the web, you can essentially reverse the above steps. Navigate to and access the relevant file. Click the options menu, go back to the sharing options, and turn them back to restricted. Alternatively, you can remove the file from Drive entirely.
Consider giving Filerev a look if you want to audit, clean up, or otherwise manage your Google Drive in bulk. I designed Filerev to be full of valuable features to audit, organize, and remove files to clean up even the messiest Google Drive account.
Whether old, shared, huge, or hidden files, Filerev can reveal them to you and help you decide if you want to keep them around or remove them.
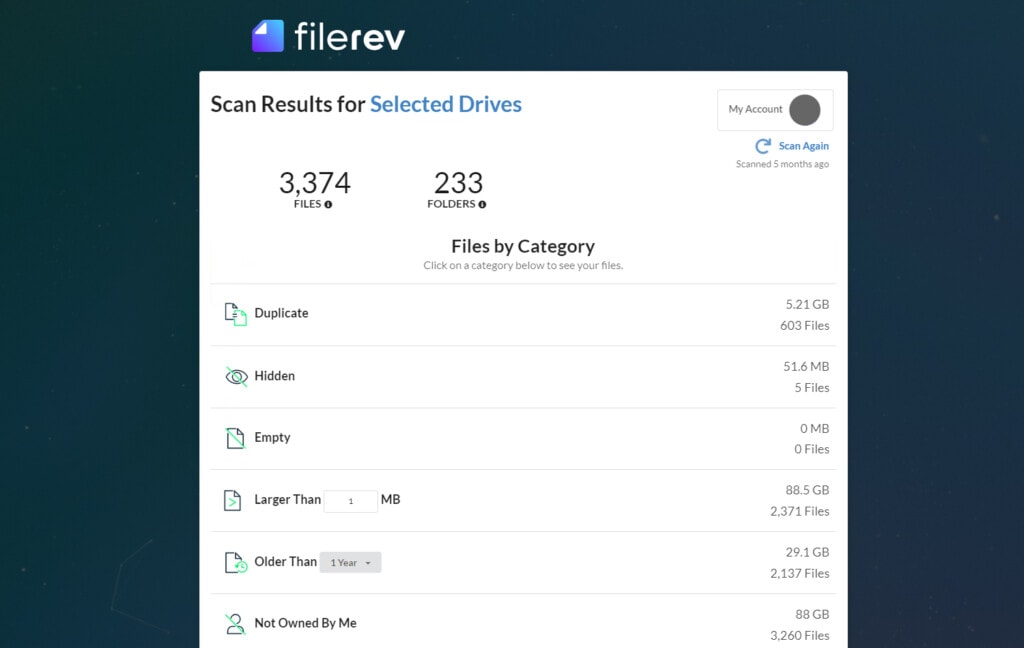
If you have ideas for additional features you’d like to see in Filerev, feel free to leave me a comment or drop me a line directly. I’m always working to improve the app, and I can’t do it without knowing what you want it to do. I look forward to hearing from you!





Leave a Reply