Did you know that before the mid-1980s, when you deleted a file, it was gone for good? There was no way to recover it. The modern version of a trash can or recycle bin, which stores deleted files until a time limit comes up or you empty it yourself, didn’t exist until it was invented by Apple and copied by Microsoft in the mid-90s.
It should be no surprise that Google Drive also has a trash can system. It’s an important feature to have. After all, if you accidentally delete the wrong file, you want to be able to recover it, right?
Google Drive’s trash folder will hold deleted files for up to 30 days. Once 30 days have elapsed, they will remove the file from it permanently, and you may not be able to recover it.
One of the most significant issues with the trash folder is that everything in it still takes up space in your Google Drive. It’s one of the biggest reasons a Drive can run out of storage space, even when you think you’ve deleted files.
Whether you need to delete or restore files, I’ve put together this guide on using the Google Drive trash folder to answer all your questions.
![]() Pro Tip: If you’re restoring a large number of files in your Google Drive trash, Filerev’s bulk restore can save significant time.
Pro Tip: If you’re restoring a large number of files in your Google Drive trash, Filerev’s bulk restore can save significant time.
How to Delete Files from Google Drive
In Google Drive, deleting files is simultaneously easy and not as straightforward as it sounds.
Every interface you can access on Google Drive will have a way to delete files, whether you use the file streaming or the file mirroring option.
- If you have the Google Drive app installed on your computer, you can navigate to that directory, find a file you want to delete, and delete it.
- Right-click — Delete will do it, as will hitting the delete key on your keyboard.
- You can also open a document and click “File” > “Move to Trash.”
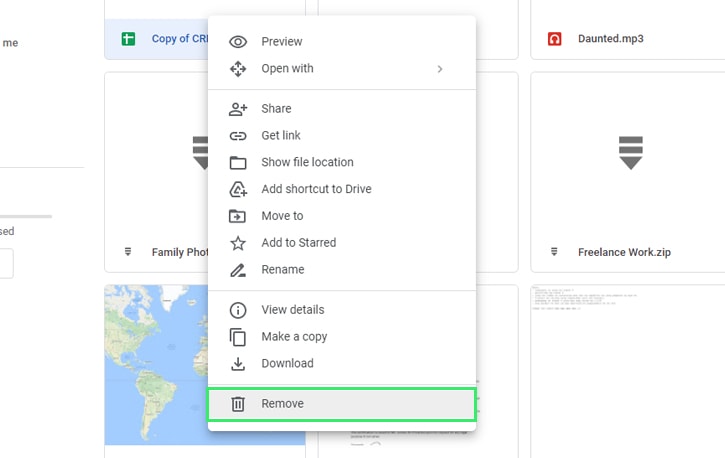
- Logging into the web interface will show you all of your files, and here you can do the same; click on the file and either hit the delete key or right-click it and click remove.
These options have one thing in common: they move the file to the trash folder.
![]() Here’s the quirk: You can’t access your Google Drive trash folder from the Google Drive desktop app. Using Finder or Windows Explorer, you can view your Drive, but you can’t view the trash folder from it. When you delete a file in this interface, it’s put into your computer’s trash folder or recycle bin and in Google Drive’s trash folder.
Here’s the quirk: You can’t access your Google Drive trash folder from the Google Drive desktop app. Using Finder or Windows Explorer, you can view your Drive, but you can’t view the trash folder from it. When you delete a file in this interface, it’s put into your computer’s trash folder or recycle bin and in Google Drive’s trash folder.
That means you can delete a bunch of stuff using the Google Drive installed version and then empty your recycle bin, and you will have freed up space on your computer, but not in your Google Drive. To do that, you need to log into the Drive web interface.
To finish emptying your trash, you have a few options.
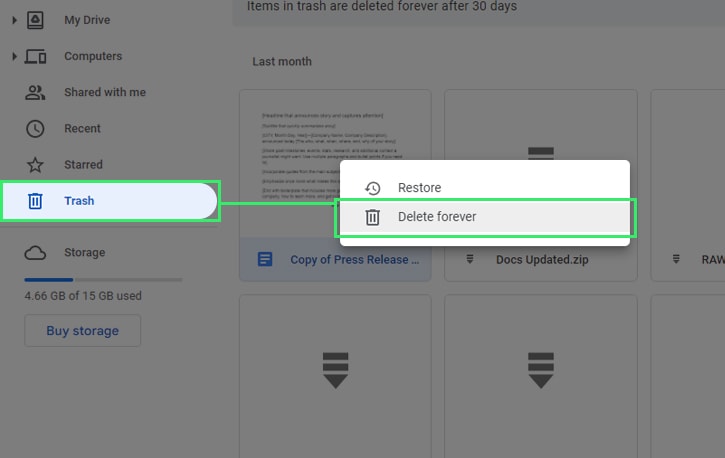
First, you can log into Google Drive on the web. Once logged in, click on Trash in the left-hand sidebar. Here, you can find individual files you want to delete permanently, right-click on them, and click Delete Forever to get rid of them.
You can also empty your trash with the Google Drive iOS or Android app. Open the app menu, tap “Trash”, tap the “…” in the corner, and then tap “Empty trash” at the bottom of your screen.
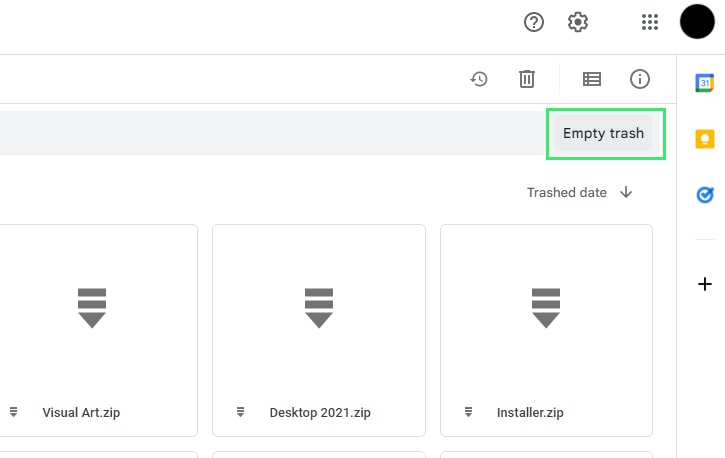
Alternatively, if you’re sure that you can delete everything in your trash and that you won’t need them anymore, you can click the “Empty trash” link at the top of the page. This option will purge everything in your trash folder permanently, freeing up the space it was taking up.
You can also wait 30 days for the files to be removed by Google automatically. Alternatively, your data retention duration will depend on admin configuration if you have Google Vault.
The other option is to use Filerev. Filerev will audit and index your files and folders in Drive and can help you determine what you do and don’t need, get rid of the things you don’t need, and free up space.
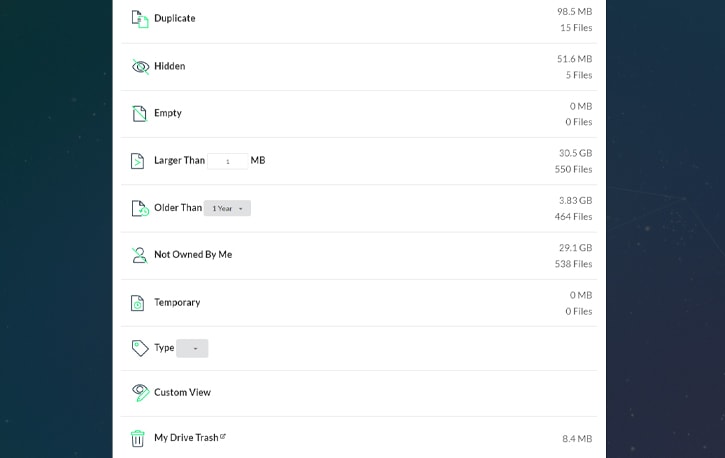
This method is way better than the basic sorting options Google Drive gives you by default!
How to Recover Deleted Files in Google Drive’s Trash
Deleting files is one side of the coin, but the other is file recovery. The whole point of the trash folder is to give you leeway in case you delete something you shouldn’t have.
Why might you want to recover files? Plenty of reasons.
- You have two files with names like “Copy of Project_2022(1) FINAL,” and you aren’t sure which one is the important one, and you choose incorrectly.
- You click a file and hit delete but don’t realize you didn’t click accurately and clicked on the wrong file.
- You deleted a file that, later, it turns out someone else had access to and was still using for their job. When you delete a file you own, anyone who has access to it loses that access unless they made a copy for themselves (see this guide for more details.)
- You deleted files that haven’t been accessed in a while, only to realize that your company data retention policy requires you to keep them.
Sometimes you might even delete whole folders with hundreds or thousands of files, only to realize you needed those to stick around.
Trash to the rescue!
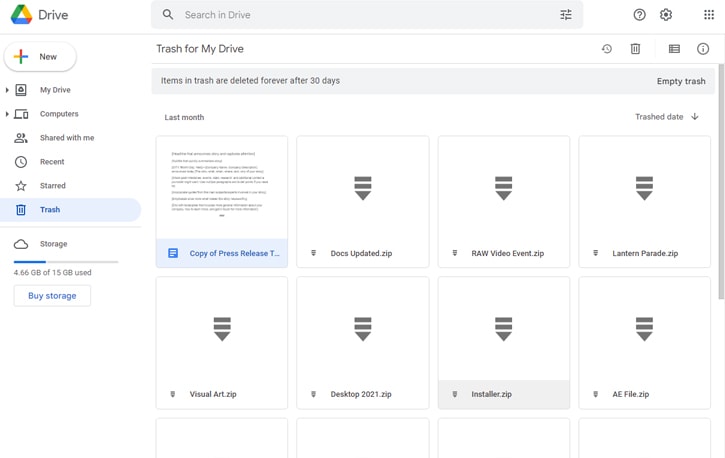
The trash folder acting as a temporary backup just in case you change your mind has been a godsend for everyone, from students to the most wizened graybeard IT techs in the business.
As I mentioned earlier, restoring files from the Google Drive trash folder can only be done through the web interface. Just like when permanently deleting files, you can’t access the Google Drive trash folder through the desktop version of Google Drive.
![]() Note: If you’re using mirrored files, when you delete files from your installed Google Drive, they will end up in your computer’s trash or recycle bin. Unlike Google Drive’s trash folder, your computer’s Recycle Bin may not be emptied automatically, and you may be able to restore files long after the 30-day window. However, this option depends on your computer’s configuration, as both Windows and macOS computers have optional settings to empty the recycle bin automatically.
Note: If you’re using mirrored files, when you delete files from your installed Google Drive, they will end up in your computer’s trash or recycle bin. Unlike Google Drive’s trash folder, your computer’s Recycle Bin may not be emptied automatically, and you may be able to restore files long after the 30-day window. However, this option depends on your computer’s configuration, as both Windows and macOS computers have optional settings to empty the recycle bin automatically.
To restore files in Google Drive, log into the web drive.google.com and click on the trash folder on the left-hand side. Here, you can see a list of all the files you’ve deleted, either as a preview or as a list. You can sort them by the time you trashed them, their name, the date they were last modified, the date you last modified them, or the date you last opened them.
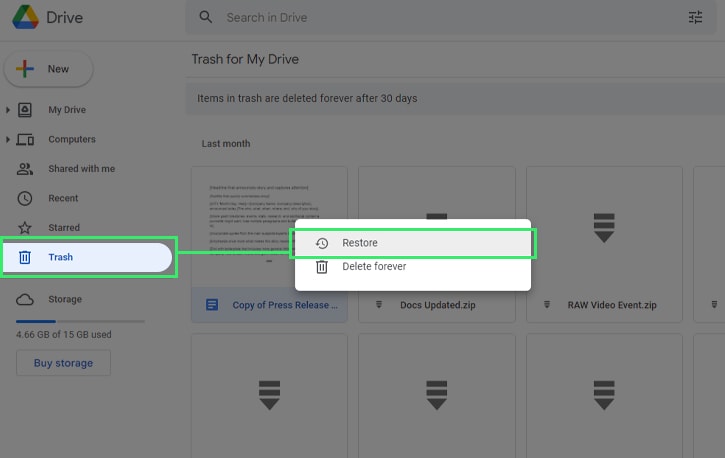
Find the file or files you want to restore. Then, right-click on the file and click Restore. This action will put the file back in your Google Drive where it was when you deleted it. Simple and easy, right?
If you have a Google Workspace account, the administrator may be able to restore files up to 25 days after they were removed from the trash. Sign into your Admin console, click “Directory > “Users,” and click on the user that deleted the files. Then, click “More options” > “Restore Data” and select the range of data that you’d like to recover. Under Application, select “Drive,” and then click “Restore.” After this process is completed, the deleted files will be visible in the exact location that they were at before your user deleted them.
The biggest issue is if you have many files in your Drive trash that you want to restore.
For example, say you accidentally deleted a folder with a few thousand photos, only to realize you didn’t have backups of most of them. So, you will need to restore them to go through them and back them up.
You can restore them one at a time, but that’s incredibly tedious and inefficient. Who wants to right-click and recover every single file when there are thousands to recover? Nobody, that’s who. Plus, every time you right-click, that menu has two options, one of which is deleting the file forever. What happens if you misclick and delete a file you didn’t want to remove?
You may not be able to get it back. That’s not a risk you want to take.
You can also highlight files and restore them all at once. Unfortunately, Google Drive uses your browser’s resources to process requests like this, and it queues up thousands of restore commands to execute. This option works, to a point.
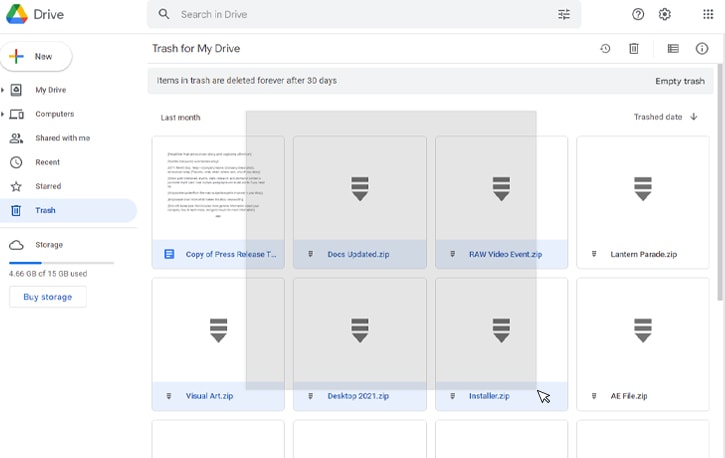
If you’re doing a few dozen or a few hundred files, that’s fine. Once you get into the thousands, you run the real risk of crashing your browser. That causes all kinds of problems, and you’ll need to close the browser, re-open it, log in again, go back to your trash, and queue up more restores.

Right now, there’s no better way around this. I recommend processing them a few hundred at a time, tedious as it may be.
Bulk Restore Deleted Google Drive Files with Filerev
This issue is a common pain point for the people I talk to, and I’ve encountered it plenty of times myself. Google Drive just isn’t built to handle restoring thousands of files efficiently. So, I’ve built a feature to handle bulk restoring files in Google Drive.
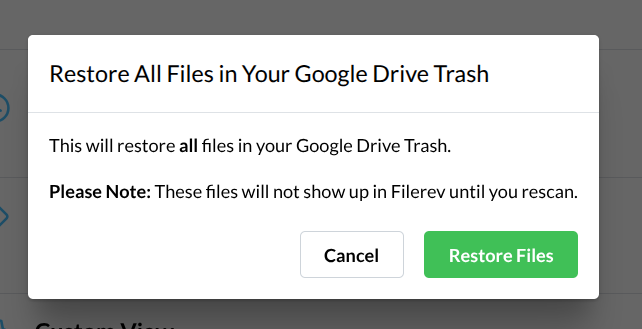
The feature is on the Files by Category Page, listed next to the My Drive Trash. Just click the three-dot menu, select “Restore Files in Trash…”, then click the “Restore Files” button in the modal that appears.

It’s important to note that Filerev will restore every file in the Google Drive trash, so make sure that is what you want.
Once you start restoring your files, Filerev will show progress in the bottom-left corner of the page.
Differences with Mirroring and Streaming Files
When you configure Google Drive for a computer or other device, one of the setup questions asks you whether you want to mirror your files or stream your files.
Streaming your files keeps them solely online. When you want to work with them, you need to access them while you’re online; Google will temporarily download the file to your computer, and they will upload any changes you save as soon as possible. If your internet connection is active, this might be immediately, or it might wait until your connection is restored.
If you mirror files, you maintain both online and local copies of files. This option takes up much more space on your device but allows you to work entirely offline if needed.
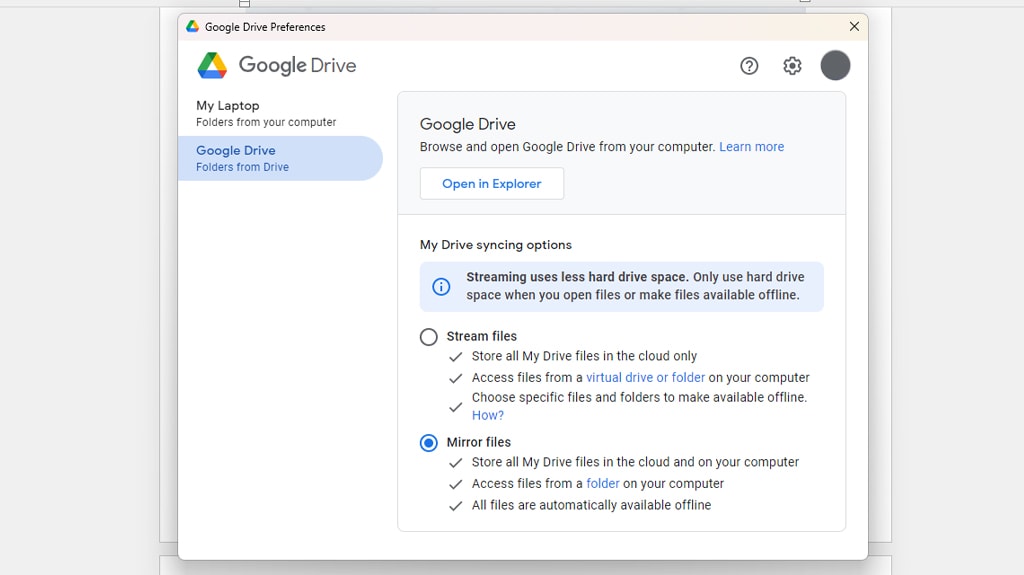
This distinction also applies to deleting and restoring files:
- If you’re mirroring/syncing files: when you delete a file online, it will be removed from your local storage and not put in your local recycle bin. When you delete a file from your local storage, your device will put it in your recycle bin and the Google Drive trash folder. When you empty your recycle bin, your local copy will be gone, but the Google Drive trash will still contain it. Conversely, when you delete it from Drive trash, it will be gone online but still in your local recycle bin.
- It’s the same story regarding restoration. If you restore a file from your local recycle bin, it will be returned to your Google Drive folder and still in Drive trash. If you recover it from Drive trash, it will be in your local folder and recycle bin.
- If you’re streaming files, changes are queued up for when you next have an internet connection. If you delete a file online while your device is offline (like if you logged in from another device), the file will not be accessible for your offline device. When you log back on, it will disappear. If you restore a file from the online system, it will not appear on your local device until you log back in.
To avoid version conflicts, Google Drive also has built-in features to notify you if someone else is working on a file you’re deleting or if a file you’re working on is being accessed elsewhere. It’s not perfect, but no collaborative system is.
Recovering Files from Hard Drive Backups
If you’re one of the unlucky few who had important files automatically deleted from their trash, and those files aren’t in your computer’s Recycle Bin either, you may be able to recover your files from a backup if you meet two requirements.

They are:
- Your computer has the Google Drive desktop app installed and configured with the “Mirroring” setting.
- Your computer has manual or automatic backups, like with the Windows Backup and Restore tool or the macOS Time Machine.
![]() Note: Before proceeding, make sure you go offline before restoring a backup to ensure that your old backup doesn’t sync with your Google Drive and interfere with your more recent files.
Note: Before proceeding, make sure you go offline before restoring a backup to ensure that your old backup doesn’t sync with your Google Drive and interfere with your more recent files.
If you meet both requirements, since Google Drive kept a file on both your computer and on the cloud, you may be able to restore your computer to a time when the files still existed on your computer. On a Mac, for example, Time Machine will allow you to recover a single folder instead of restoring your entire computer, so you can retrieve your old Google Drive folder, copy the files you need, then revert to the most recent backup.
Once you’ve recovered the files you need and restored your computer to your most recent backup, copy your recovered files back into your Google Drive folder and re-enable your internet access to sync your files.
Google Drive Emergency File Recovery Tool
There is a lesser-known option on Google Drive’s Help Center to request an emergency file recovery.
Visit this page, then scroll down and click the blue “Request file recovery” button.
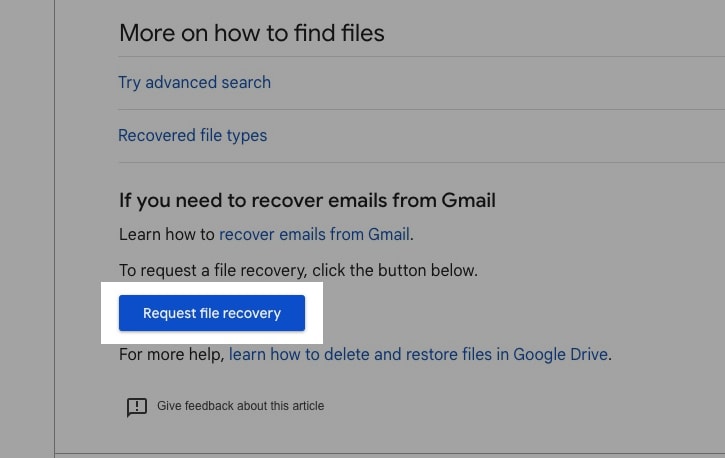
You’ll have to re-login to Google, fill in your first and last name, and then consent to allow Google to attempt to recover your files.
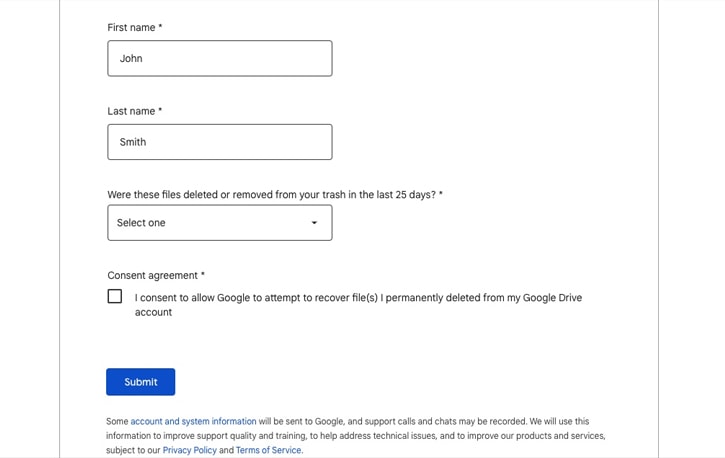
![]() Note: Google states that this may only work with files you own, not those that somebody shared with you. There is also a disclaimer that they may not be able to recover your files unless you deleted them recently, and they cannot recover files from Gmail or Google Photos.
Note: Google states that this may only work with files you own, not those that somebody shared with you. There is also a disclaimer that they may not be able to recover your files unless you deleted them recently, and they cannot recover files from Gmail or Google Photos.
Additionally, Google will sometimes change the recovery process so referring to it’s documentation on how to recover deleted files can also be useful.
As a last-ditch effort, you can also get in touch with a Google Drive specialist using this link. Several users on Google’s Help Center and Reddit have successfully recovered their files using this form.
Your Questions
Do you have any questions about deleting or restoring files from Google Drive? I can’t guarantee I know how to recover a file that is long gone (it’s probably unrecoverable), but I can give you an idea of where to check! I’ve tried to be as comprehensive as possible, but I may have missed something. If you have a question I haven’t covered, please let me know, and I’ll do my best to answer it.

