The more you have stored in a Google Drive account, the more difficult it can become to find anything in particular you need to find. It’s not a problem if you have a robust filing system or a complete awareness of what’s in your Drive, but most people don’t maintain either one of those, and it can get especially impossible if you’re working with shared drives, large, multi-terabyte drives, or very old drives full of files with helpfully descriptive names like “32987509843251.xlsx”.
Luckily, Google has a lot of little tools you can use to organize your Google Drive account to keep your account clean moving forward and to help sort through everything already there. All you need is to know what options you have and how to use them.
Luckily, that’s why I’m here!
Using Stars on Files and Folders in Google Drive
First up, you have stars. If you’ve used Gmail before, you likely have some idea of what stars are, but they work a little differently on Google Drive.
A star is an attribute you can add to a file or a folder. If you add it to a folder, it’s just added to the folder itself, not to anything in the folder, so keep that in mind.
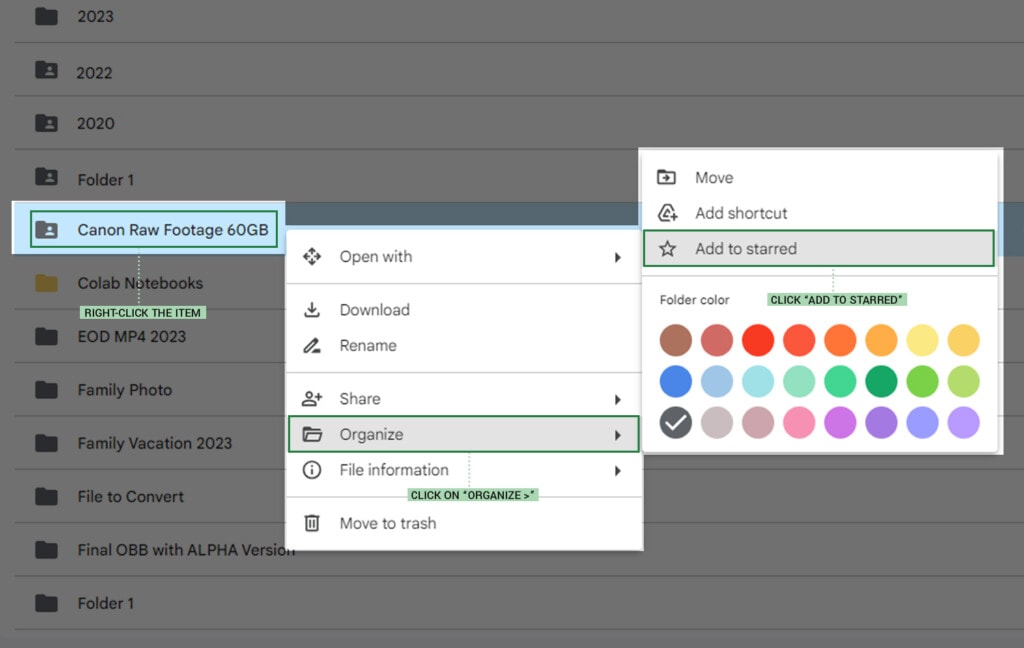
To add a star to an item, follow this procedure:
- Log into your Google Drive account at drive.google.com.
- Navigate to the item you want to add a star to.
- Right-click on that item.
- Click on “Organize >”
- Click “Add to Starred”
This will add a star to the item, be it a file or a folder.
If you want to add stars to more than one item at once, you can hold Ctrl or Cmd and click on multiple items to select them all at once. Otherwise, the procedure is the same.
Once a star has been added to an item, the item will have a star after the file or folder name. That is:
Filename.docx
Will become:
Filename.docx ★
To remove a star from an item, follow the same steps and click “remove from starred” when prompted.
How can you use stars to organize Google Drive? It’s relatively simple. On the left-hand side of Google Drive, there’s a series of filters you can click on to view different groups of files. You can view “My Drive” to see anything in your Drive or “Computers” to see what files are synced with computers (and which computers). You can see recently accessed or added files or files in the spam or trash menus. One of those options on the menu is Starred.
Click the Starred label on the left-hand sidebar, and Google will display for you all files and folders that have stars. It’s just that easy.
You can also use Google Drive’s built-in search. When you click on the Advanced Search option, you can click on the “starred” button to search just within starred files. You can also type in “is:starred” for the same effect on any search query.
Using Colors on Folders in Google Drive
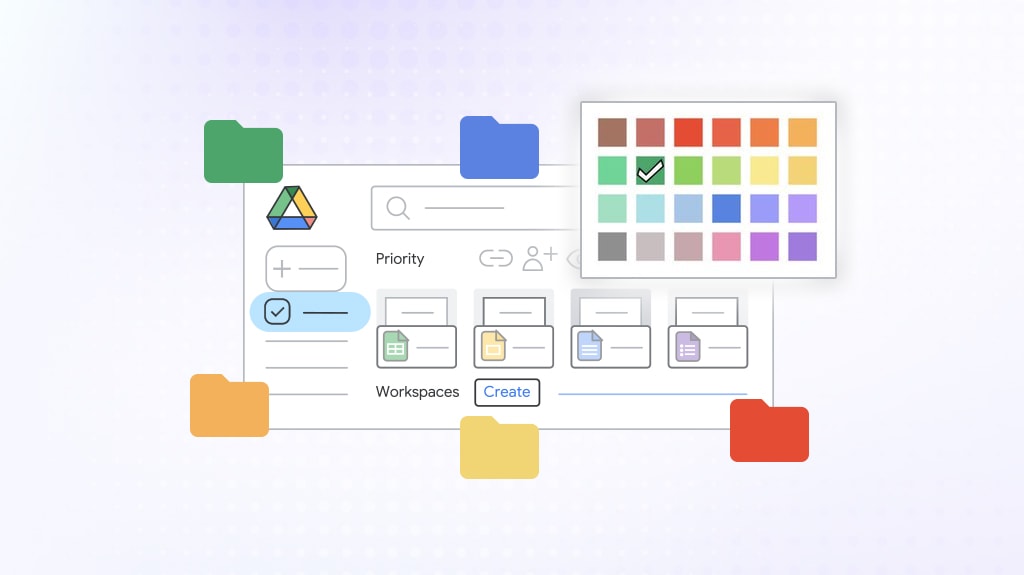
Adding a color to a folder in Google Drive will change the icon for that folder to be that color. Folders, by default, come in a gray color, but you can change it to one of the preselected colors Google allows. Those colors all have specific names, though they’re all also basic colors.
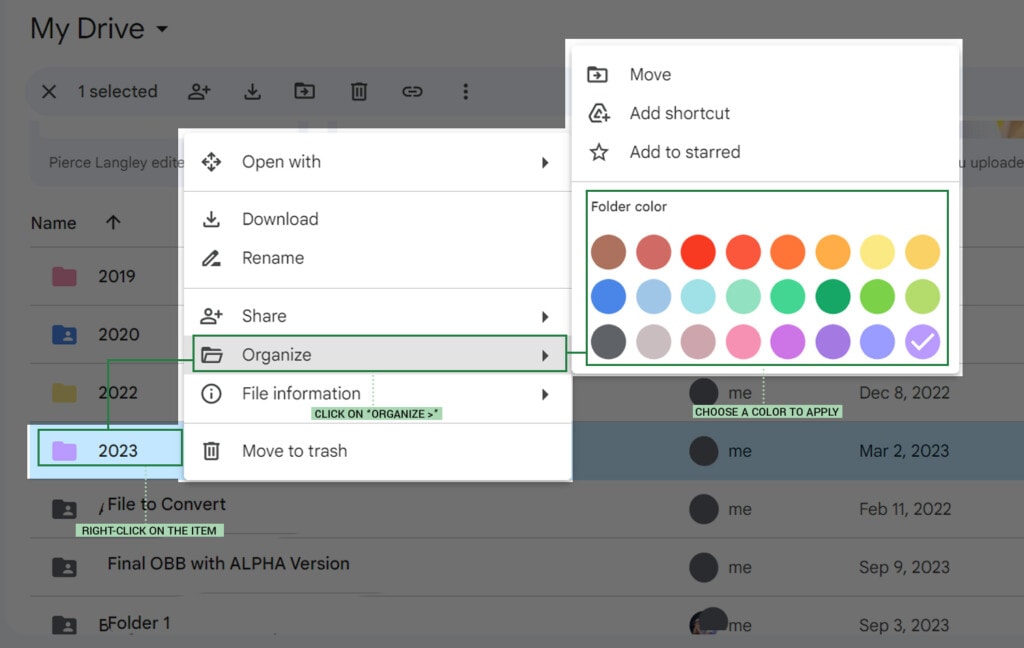
The options are:
- Chocolate Ice Cream
- Old Brick Red
- Cardinal
- Wild Strawberries
- Mars Orange
- Yellow Cab
- Desert Sand
- Macaroni
- Rainy Sky
- Demin
- Pool
- Sea Foam
- Spearmint
- Vern Fern
- Asparagus
- Slime Green
- Mouse
- Mountain Grey
- Earthworm
- Bubblegum
- Purple Rain
- Toy Eggplant
- Blue Velvet
- Purple Dino
Why Google chose to label their colors in these specific ways is a mystery. Someone probably thought they were being clever or cute, and no one stopped them. Regardless, the name of the color doesn’t really matter; all that matters is that you can see and recognize the colors.
Interesting to note: This color selection is actually fairly good for people with various kinds of color blindness. It isn’t perfect, and several of the colors can look quite similar, but when put next to each other, they’re generally fairly distinct in different kinds of color weakness. You can check it out for yourself by taking a screenshot and testing it here.
How do you add a color to a folder?
- Log into your Google Drive account at drive.google.com.
- Navigate to the folder you want to color-code.
- Right-click the folder.
- Click on “Organize >”
- Choose a color to apply.
Once you apply a color, the color is applied automatically and will tint the icon for that folder in your Google Drive view.
That’s pretty much all there is to it for your folder colors. They’re simply a visual addition, unlike stars. You can’t search to find all folders of a given color, either; they’re purely cosmetic. As such, they’re a little less useful as an organizational tool and are more useful as a navigational tool. For example, you might:
- Color-code folders with different kinds of files in them in different colors, e.g., green for movies, blue for images, and red for music.
- Use colors to tint shortcuts to folders to help differentiate them from actual folders.
- Use color to differentiate purposes: one color for archival, one color for active projects, one color for projects with collaborators, and so on.
However you choose to use colors, remember that they are only visible to you, and they only apply to folders. You cannot color-code files; they have their own icons with their own colors, as chosen by Google already.
Using Google Drive’s Priority System
Another way you can organize Google Drive is by using the Priority system. Note that this system only exists for people using paid Workspace accounts and is not available for people simply using the free Google Drive that comes with any Google account. Thus, if you don’t see the Priority options, you may need to upgrade your account.
What is Priority, and how does it work? Basically, it allows you to create a faux “folder” of files and folders that get labeled as a priority and set that priority folder to be your homepage in Google Drive instead of the basic root folder. You can also allow Google Drive to use its own machine learning to pick what should be in the Priority window based on your usage and access history.
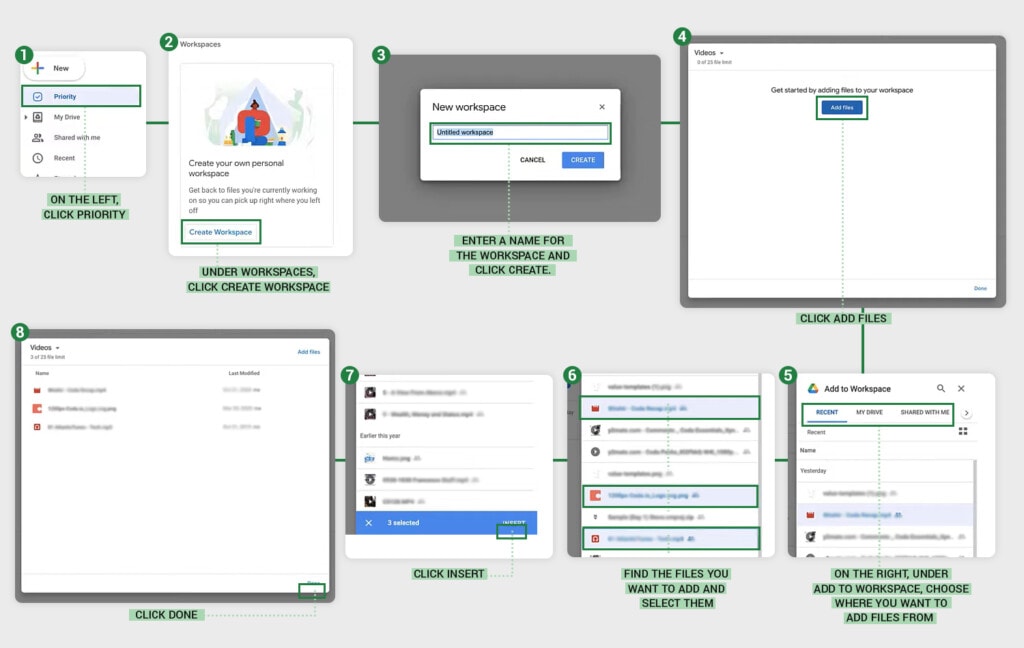
Here’s how to use it directly from Google Help:
“Create a workspace and add files
- Open Drive.
- On the left, click Priority.
- Under Workspaces, click Create Workspace.
- Enter a name for the Workspace and click Create.
- Click Add files.
- On the right, under Add to Workspace, choose where you want to add files (Recent, My Drive, Shared Drives, and so on).
- Find the files you want to add and select them.
- Click Insert.
- Click Done.
To add a single file to a workspace, right-click a file and click “Add to workspace,” then click the workspace name. To remove a file from a workspace, right-click a file and click “Remove from workspace.”
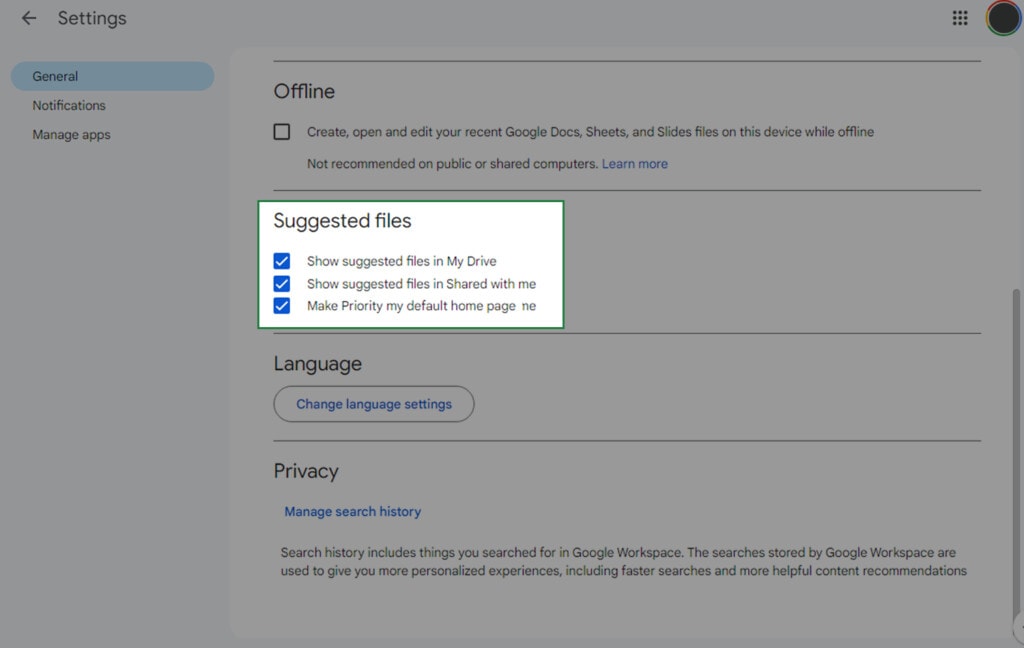
Make Priority your homepage
- On your computer, go to drive.google.com.
- At the top right, click Settings General.
- Under Suggestions, check or uncheck the boxes you want to use:
- Show suggested files in My Drive and shared drives
- Show suggested files in Shared with me (page refresh required)
- Make Priority my default home page
- Click Done.”
All done!
You can use this in conjunction with stars and colors or on its own, depending on how you choose to organize your Google Drive.
Google Drive Organization FAQs
Now, let’s cover some questions that are likely to come up in the process of organizing your Google Drive.
Can You Use Stars and Colors Together?
Yes. Nothing prevents you from using more than one organizational feature at once. The only limitation is that you can only use one color at a time; no making a file or folder both red and green, for example.
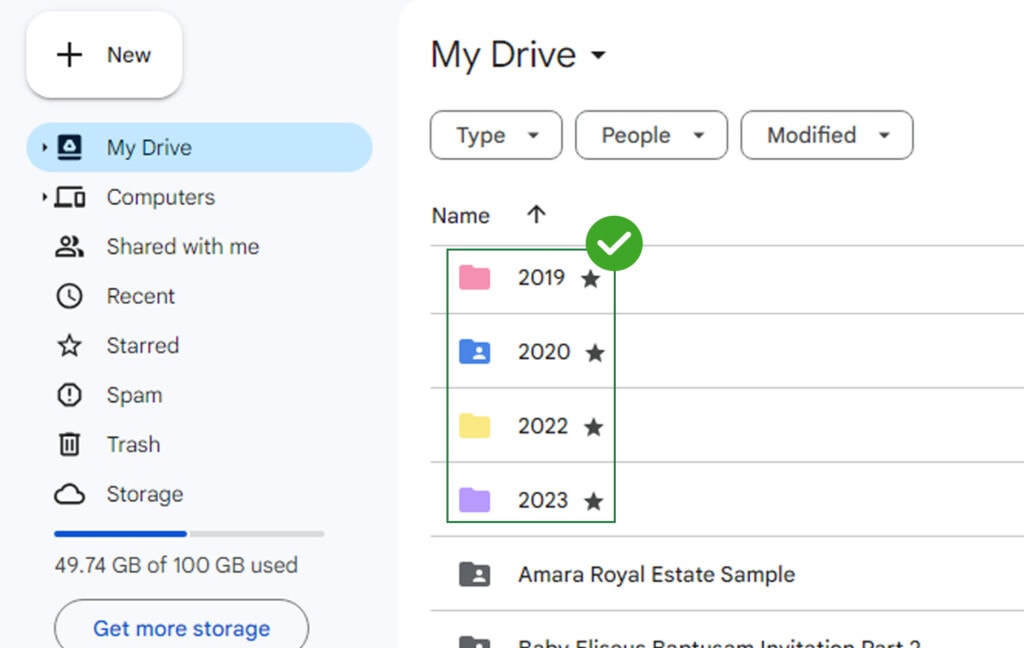
You can, however, get around this with shortcuts. If you make a file color-coded, say, red, you can then create a shortcut to that file and put the shortcut somewhere else. The shortcut will, by default, be the color that the original file was. However, you can change that color.
Do Stars, Colors, or Other Organizational Tools Work with Drive for Desktop?
No. Drive for Desktop treats your Google Drive as if it’s a volume, folder, or file system, just like any other section of your computer’s hard Drive. That means that it uses the icons for those things that are assigned to your computer.
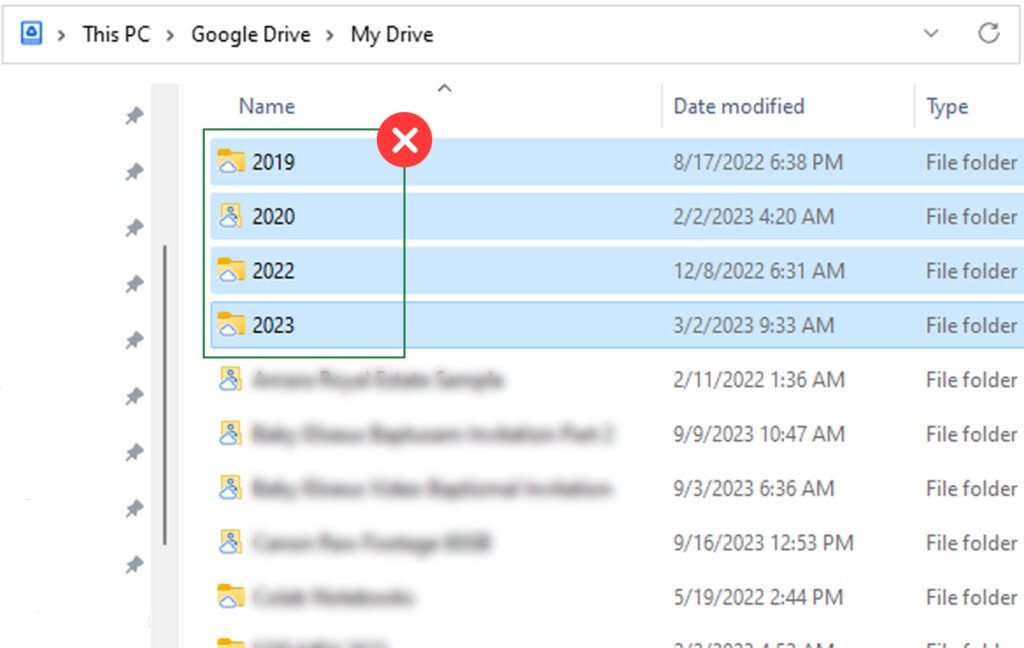
Color-coding folders or adding stars to files is not reflected there because it’s just metadata on the Google end of the file system.
No. As it currently stands, colors and stars are labels that are attached specifically to your Drive and your ownership over those files; other people who can view the files will be able to apply their own colors or stars according to their own organization.
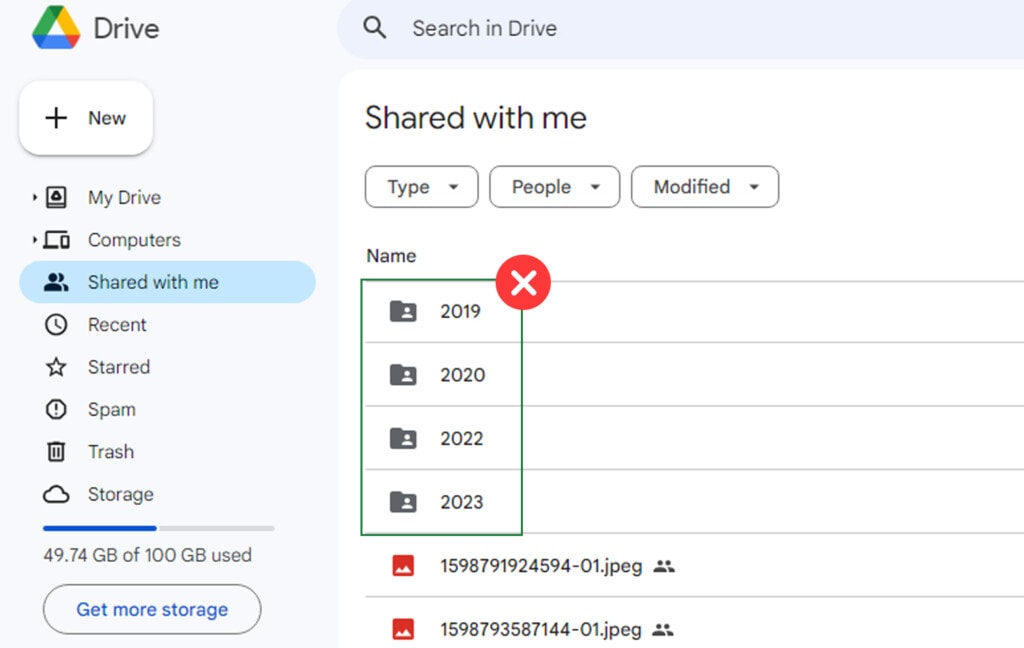
They don’t see yours and aren’t affected by your adding, removing, or changing them on your end. Similarly, if you share a file with someone else and they choose to star that file, you won’t see the star.
Is There Anything Else to Use to Organize Google Drive?
Yes. Another option you have available to you is file and folder descriptions.
Descriptions are small fields attached to each file and folder that you can use to add information about it. To add them, click on a file or a folder and look for the details pane on the right side of the window. If the details pane isn’t there, right-click on the file or folder, click File Information, and click Details to make it appear.
At the bottom of the details pane is a box labeled “Description.” In this box, you can type anything you want as an added description for the file. You have up to 25,000 characters worth of space to add a description here, so you can be as robust as you want.
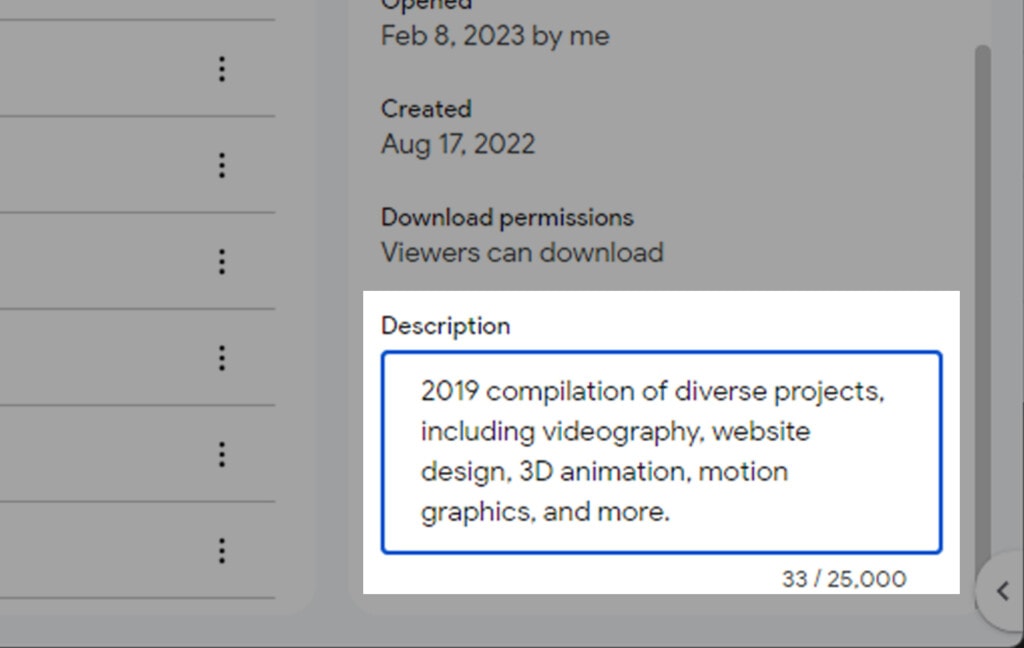
How can you use descriptions? Other than simply viewing them if you’re unsure of what a file or folder contains, these descriptions will also appear in the search results when you search for words and phrases in the Drive.
It’s worth noting that most files that Google can open and recognize that have text in them will also be indexed by this search, so when you add keywords to a description, the search results can find files with both those keywords in the description and in the file itself.
Using Filerev to Sort, Organize, and Clean Google Drives
Finally, one other option is to use Filerev. I designed Filerev to be a robust platform for organizing and cleaning up even the largest and most cluttered Google Drive and Workspace accounts. All you need to do is allow it access, and it will scan, audit, and analyze your files automatically.
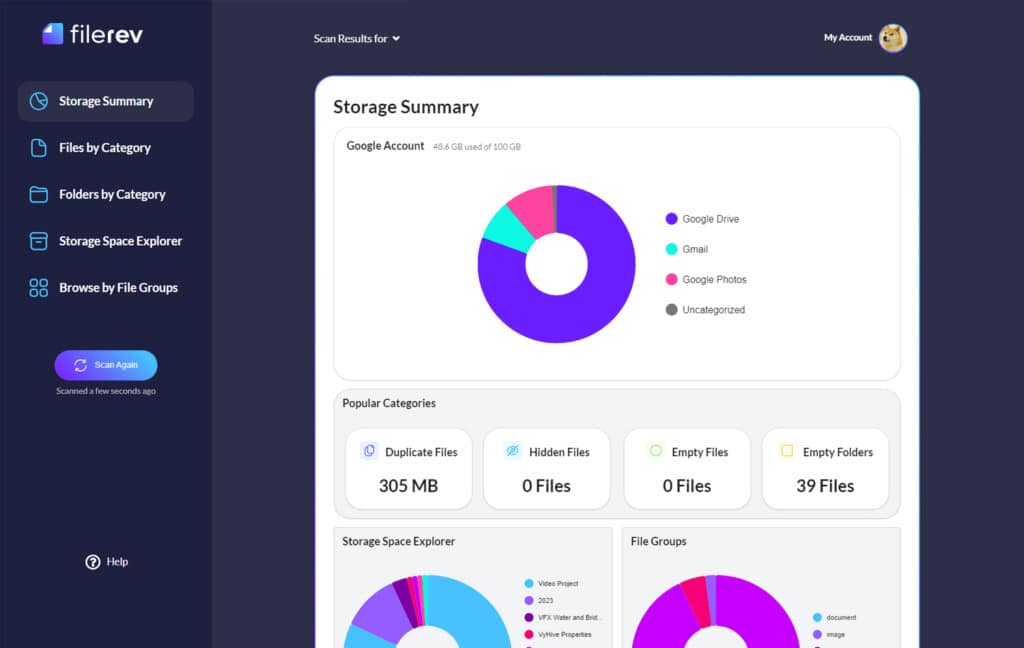
You can then search through your files and find things like:
- The oldest files that have sat unused for years.
- The largest files that are taking up space.
- Invisible files that Google hides from you.
- Duplicates of files you probably don’t need.
- Folders or files with no content, taking up space for no reason.
- Clean and remove temporary files.
- View, organize, and remove shared files.
With so many features and new ones being added regularly, I hope you give it a try. If you have any feedback, feature requests, comments, or questions, feel free to ask me as well. I’m always happy to chat and help out anyone interested in using my tool.






Leave a Reply